CLICK HERE FOR FREE BLOGGER TEMPLATES, LINK BUTTONS AND MORE! »

Thursday, April 28, 2011

Holiday Green Bean Casserole


Okay, so I know that Green Bean Casserole is traditionally consumed on Thanksgiving.  And, let's face it- that recipe off the back of the French's fried onion can is SO good!  I started thinking- really radical thinking here- that none of the ingredients in green bean casserole are particularly designated "holiday" or "Thanksgiving" ingredients...green beans? No.  Mushrooms? Nope.  Fried onions? nada.  So why not apply the "holiday" part of the recipe name to Easter? Eh eh?


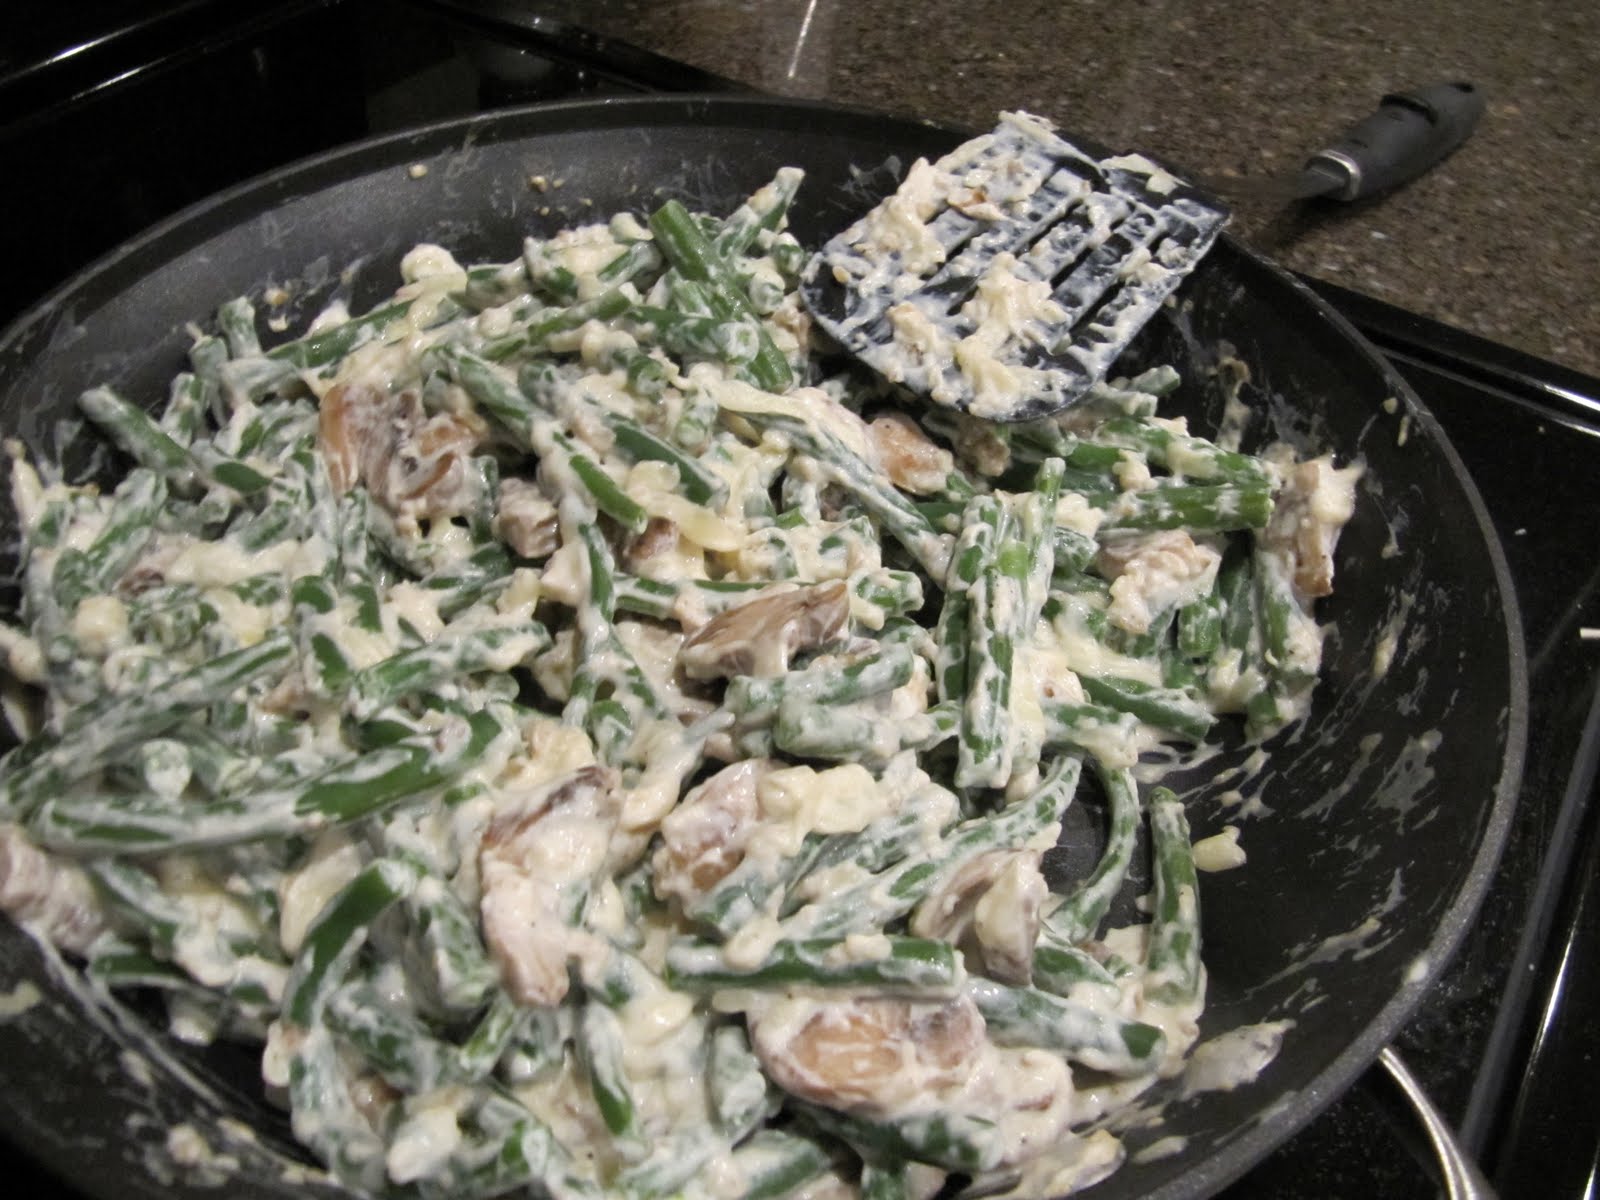
However, I did NOT make the traditional recipe from French's onion can.  I found this recipe in my Taste of Home cookbook, a healthier version, which guaranteed that "you'll never go back to the old version after trying these green beans!"  Now I don't know if I'd be so bold as to say that I will never ever go back to eating those... after all I'm not even the one who makes it on Thanksgiving... but this WAS very good.  It was lighter and healthier and very flavorful and cheesy.  Just be sure to boil the green beans for long enough- check that they are the right texture- because ours were just a tad crispier than we intended.  But it was still great.


Holiday Green Beans
Holiday Green Be
  • 8 cups cut fresh green beans (about 2 pounds)
  • 1/2 pound sliced fresh mushrooms
  • 2 tablespoons butter
  • 2 tablespoons all-purpose flour
  • 1 teaspoon dried minced onion
  • 1/2 teaspoon pepper
  • 1/2 cup fat-free milk
  • 1 cup reduced-fat sour cream
  • 1 teaspoon Worcestershire sauce
  • 1-1/2 cups (6 ounces) shredded reduced-fat Swiss cheese

  • TOPPING:
  • 1/3 cup slivered almonds
  • 1/3 cup crushed cornflakes
  • 1 tablespoon butter, melted

  • Place beans in a Dutch oven and cover with water; bring to a boil. Cover and cook for 3-5 minutes or until crisp-tender; drain and set aside.
  • In a large skillet, saute mushrooms in butter until tender. Stir in the flour, onion and pepper until blended. Gradually stir in milk. Bring to a boil; cook and stir for 1-2 minutes or until thickened. Remove from the heat; stir in sour cream and Worcestershire sauce. Stir in beans and cheese until blended.
  • Transfer to an 11-in. x 7-in. baking dish coated with cooking spray (dish will be full). Combine topping ingredients; sprinkle over the top.
  • Bake, uncovered, at 400° for 12-16 minutes or until bubbly and heated through. Yield: 12 servings.


Nutrition Facts: 2/3 cup equals 144 calories, 7 g fat (3 g saturated fat), 20 mg cholesterol, 108 mg sodium, 12 g carbohydrate, 3 g fiber, 9 g protein. Diabetic Exchanges: 1 lean meat, 1 vegetable, 1 fat, 1/2 starch

Tuesday, April 26, 2011

Strawberry Cream Cheese Waffles

Alright so I'm not so sure how this "vegetarian" thing is working out.  Even though I can honestly say that for a few days I was seriously considering refraining from meat altogether.....

I'm pretty sure it was just a phase.  Like I predicted.
You see, I made and ate homemade pepperoni pizza for dinner tonight (recipe coming soon)... the same pepperonis that I tried a few days ago and had to spit out.  Still, I'm only PRETTY sure.  I still am very interested in the "Meat-less May" and am definitely going to be cooking a lot more meatless meals.  At LEAST one or two a week.

Until I figure it out though, I can always just live off of yummy breakfast foods, like these FABULOUS strawberry cream cheese waffles that I made for my hubby and I for Easter breakfast.  They were honestly some of the best, if not the best waffles I have ever had.  You must try them!

I'll admit I forgot to serve these with the whipped cream/cool whip that the recipe calls for! My husband mentioned "these would be good with cool whip" and I then felt like a complete idiot!  Good thing we made seconds and were able to smother it with Lite Cool Whip... SO good! Tasted like Strawberry Shortcake in waffle form.  And P.S. the strawberry sauce is a must if you're going to make this recipe!

Strawberry Cream Cheese Waffles
  • 2 ½ c all purpose flour
  • 1 tsp salt
  • 4 tsp baking powder
  • 3 Tbsp sugar
  • 2 eggs
  • 2 ½ cups whole milk
  • ½ cup canola oil
  • 1 tsp vanilla extract
  • 4 oz cream cheese, NOT softened
  • 1 c chopped strawberries
  1. In a large bowl, whisk together the  flour, salt, baking powder, and sugar.
  2. In another bowl, whisk together the eggs, milk, vegetable oil, and vanilla.
  3. Cut the cream cheese into slices and then cut each slice into little cubes of cream cheese.  Keep them all separated on a plate. Set aside.
  4. Stir the wet ingredients into the dry ingredients until just combined. Let the batter rest for 2 minutes and then fold in the strawberries. Do not over beat.
  5. Pour the batter into a preheated waffle iron. The amount of batter will depend on the size of your waffle iron. I used my regular Belgian waffle iron.  Then drop a few cubes of the cream cheese into each waffle.  I put about 5-6 per waffle.  Bake until lightly browned.
  6. Serve with strawberry sauce and sweetened whipped cream. I was able to get 16 waffles from this recipe in my waffle iron.
Strawberry Sauce
  • 1 1/2 lbs. strawberries, diced
  • 1 cup sugar
  • 1 1/2 tsp almond extract **
  1. In a large sauce pan, combine the strawberries, sugar, and extract.  Bring to a simmer over medium heat.  Simmer for 1 minute and remove from heat.
  2. Allow the mixture to cool for a few minutes so it is just warm.  Place 1 1/2 cups of the mixture from the sauce pan in a blender.  This is where you need to be careful.  Don’t put the lid on the top all the way.  Leave it cracked or the steam from the strawberries could cause an explosion.  If you have an immersion blender, feel free to use that and no chance of an explosion.  Blend until smooth and stir back into the remaining strawberry mixture in the pan. Serve warm over the Strawberry Cream Cheese Waffles
**This mixture can all be blended if you prefer a smooth sauce.  Vanilla extract can also be used in place of the almond extract.

Monday, April 25, 2011

Veggie Quesadillas

After loads and eons of junk food and candy yesterday (hello Easter Bunny), I feel confident in saying that I am GLAD to be back on a regular eating schedule again.  ("Easter" seemed to last the whole weekend with one of my best friends getting married on Saturday- Saturday's wedding and Sunday's Easter celebration were just full of free treats and gimmes)

And boy is this recipe perfect for a sugar OD (overdose) reversal.  Because it's full of veggies and healthy goodness.

These veggie quesadillas are really, really good.  I promise you that you will not even notice that there is no meat in them.
Speaking of meat, I have recently decided that I want to eat far less meat in my diet.  

I am a student at ASU studying nutrition and we recently learned all the details about how we get meat/poultry.  I have always been a meat lover but since that class, I honestly can say that I do not look at meat in the same way.  The few days following last week's lecture, I have found meat to almost appall me- it didn't even TASTE good.  Now, I'm sure that this is probably just a phase that I will outgrow.  However, the following day I read a post on The Healthy Apron called "Meat-Less May."  I was really intrigued to learn that a lot of people are going to try eating vegetarian either partially or completely for the month of May.

Do I dare say I might do it??  I am very curious at how hard it will be.  Will my body will start to crave meat or will I accustom to a meat-less diet?  And how will my body feel?  I know that if vegetarians do not cleverly plan their diets, they can be at risk for low protein and iron intakes.  I will definitely have to get my protein and iron from other  foods like milk and nuts and iron-supplemented cereal.  


I am very interested in this meat-less May idea and am going to do it!  Do you dare try it as well?

Start with this Veggie Quesadilla recipe and you'll find that meat-less cooking is: a) inexpensive, b) delicious, and c) healthy!

Veggie Quesadillas
from Favorite Family Recipes

1 c. frozen corn
1 c. grated zucchini (juices squeezed out)
1/2 bunch cilantro, chopped
2 Tbsp. diced jalapeno (or more if you like it hot)
1 can black beans, drained and rinsed
1/2 tsp. salt
1/4 tsp. pepper
1-2 tsp. chili powder
1/2 tsp. cumin
2 c. Monterey Jack cheese (or cheddar or Mexican blend), shredded
flour tortillas (I recommend whole-wheat tortillas)

In a large bowl, combine all ingredients except for the cheese (and tortillas of course). Place mixture in a large skillet and fry until hot. In the meantime, heat a medium-sized skillet over medium heat. Place a tortilla in the pan. On half of the tortilla add a few large scoops of the corn/bean mixture and a little cheese. Fold tortilla over, then flip sides. When cheese is melted, cut in half and serve!

Thursday, April 21, 2011

Supernatural Brownies

"Supernatural," huh? Like the song by Katy Perry? Look, I didn't come up with the name.  I just found and followed the recipe.  Here- there are lots of fun brownie recipes. 


If I were to be completely honest though.. and I always am of course... these were the first homemade brownies I've ever made.  Ever.  

Shocked? So am I... I honestly have no idea how that has happened! I think my love for baking all types of homemade cookies just left no room for any brownie making...


But let me tell you, that I will NEVER go without making homemade brownies again.  These were amazing! Especially after they cooled. Even more especially the next day after sitting in the fridge! Pretty supernatural, if you ask me.


Supernatural Brownies
2 sticks (1/2 pound) unsalted butter
8 ounces bittersweet or semisweet chocolate, cut into 1/4-inch pieces
4 large eggs
1/2 teaspoon salt
1 cup granulated sugar
1 cup firmly packed dark brown sugar
2 teaspoons vanilla extract
1 cup all-purpose flour
One 13x9x2-inch pan, buttered and lined with buttered parchment or foil

1. Set the rack in the middle of the oven and preheat to 350 degrees.
2. Bring a saucepan of water to a boil and turn off heat. Combine butter and chocolate in a heat proof bowl and set over pan of water. Stir occasionally until melted.
3. Whisk eggs together in a large bowl, then whisk in the salt, sugars, and vanilla. Stir in the chocolate and butter mixture, then fold in the flour.
4. Pour batter into prepared pan and spread evenly. Bake for about 45 minutes, until top has formed a shiny crust and batter is moderately firm. Cool in pan on a rack. Wrap pan in plastic wrap and keep at room temperature or refrigerated until the next day.
5. To cut brownies, unmold onto a cutting board, remove paper, and replace with another cutting board. Turn cake right side up and trim away edges. Cut brownies into 2-inch squares.

Sunday, April 17, 2011

Zucchini Bake with Feta and Thyme

As much I wish weren't true, I'm not a HUGE veggie lover.  Don't get me wrong, I really like potatoes, and corn and carrots and snap peas and just about most other veggies.  But I don't completely LOVE them.  I don't crave them, you know?

I especially don't like cucumbers or zucchinis.  Funny how the name of this post is zucchini, yeah?

Well, this recipe that I found at Real Mom Kitchen pretty much changed my mind!
The soft, baked zucchini and yellow summer squash taste delicious with the savory herbs and feta cheese.  I will definitely make this again!

Zucchini Bake with Feta and Thyme

  • 4 medium-sized zucchini, or a mixture of zucchini with yellow squash, sliced lengthwise and then into 1/4 inch slices (about 8 cups sliced squash)
  • 1 T olive oil (or less, depending on the pan)
  • 1 T minced garlic
  • 2 large eggs
  • 1/3 cup light sour cream
  • 1 cup crumbled feta (not tightly packed)
  • 1/2  T dried thyme
  • 2 T grated Parmesan cheese
  • 1 T lemon juice
  • salt and fresh ground black pepper to taste
  1. Preheat oven to 375 degrees. Wash and dry squash, then cut off stem and blossom end and discard. Cut squash lengthwise in half, then slice into half-moon slices about 1/4 inch thick. (Kayln used a mandoline with a 7mm blade, but I just used a knife.)
  2. Heat olive oil in large non-stick frying pan, add garlic and saute about 45 seconds (just long enough to season the oil, don’t let the garlic brown.) Add squash slices and saute about 4 minutes, turning a few times. Squash should be barely starting to soften.
  3. While squash cooks, break eggs into a small bowl or glass measuring cup and beat until egg yolks and whites are combined. Stir in sour cream, feta, thyme,  Parmesan, and lemon juice.
  4. Spray a 2 quart gratin dish or glass casserole dish with non-stick spray or olive oil. Layer half the squash in the dish, then season with salt and fresh ground black pepper. (Remember the feta is salty, so it won’t need a lot of salt.) Pour over half the egg-feta mixture and use the back of a spoon or a rubber scraper to spread it over the squash. Repeat with another layer of squash and the rest of the feta-egg mixture.
  5. Bake at 375 degrees for 40-45 minutes, or until the mixture is bubbling, slightly set, and top if lightly browned. Serve hot. Makes 6 side dish servings.

Thursday, April 14, 2011

Sour Cream Chicken Enchiladas


Yeah, the white stuff is sour cream.  Sorry for its lack of beauty (sour cream in the oven never makes for a pretty presentation- see my Deep-Dish Taco Squares) but it sure rubs ya right when you take a bite!  

Okay i KNOW this recipe is not the most thigh-friendly (I'm still working on finding a a guilt-free enchilada recipe), but I did have an excuse to make it.

A) It was Fast Sunday.
B) My family was coming over for dinner!  Forrest and I were in charge of making dinner and dessert. (I made the cheesecake for dessert that I posted about earlier this week)
C) It is my mother-in-law's recipe who is a FABULOUS cook.  She gave me a cookbook with Pratt family recipes in it for my bridal shower and I am so excited about it.

Therefore, I was completely justified in making a delicious, cheesy, fatty, delectable Mexican dish!


Sour Cream Chicken Enchiladas
from Terry Pratt

12 corn or flour tortillas
3 cups chopped chicken breasts (cooked)
1/4 c. minced onion
1 pt. sour cream
4 cups green chili sauce*** (see below)
1 lb. jack cheese, grated
salt to taste

Heat tortillas on griddle with a little oil.  Blot.
Mix 1 cup chili sauce with chicken.  Put 1/4 cup chicken mixture on tortilla and roll up.
Place on oblong baking dish (sprayed with Pam) and cover with grated cheese.
Add remaining chili sauce on top.
Bake for 20 minutes at 350 degrees.  Remove from oven and smother sour cream over top and return to oven for 10 minutes.  

Serves 6.

**Green Chili Sauce

1/4 cup salad oil or olive oil
1/2 cup minced onion
1 cup water
salt to taste
clove of garlic or powder
1Tbsp. flour
1 cup diced green chilies

Saute garlic and onion in heavy saucepan.  
Blend in flour with wooden spoon.
Add water, oil and green chilies.  Bring to a boil.  
Simmer for 5 minutes, stirring frequently.

YUM!

Monday, April 11, 2011

Lemon Cheesecake with Raspberry Sauce

So guess what.  I love dessert.  A lot.
Sometimes that's a bad thing.
Most of the times it's good though.

Because sometimes I end up making things like this.
Probably one of the best desserts I've had.


Last night we had my family over for Sunday dinner in our small little house.  I made some bomb enchiladas (recipe to come soon!), a black bean side dish, and this fabulous CHEESECAKE!

I had ever made a cheesecake before, and even though it wasn't hard at all to mix the ingredients, it was VERY time consuming! It needed longer to bake than the recipe called for and since it was hard to tell when it was done (center is still supposed to be "slightly" jiggly- what defines "slightly?!"), I just kept it in the oven until I was confident that it was done.

THEN it was time for refrigeration... for at least 4 hours! 

Meanwhile I whipped up some raspberry sauce that I thought would go well with it...


And then it was time to serve- out of the fridge!


It was BEAUTIFUL and better yet, it tasted fabulous! My whole family loved it and Forrest and I ended up going back for seconds after everyone left... shhh :)

Lemon Cheesecake
from Betty Crocker
 
Crust
1 box yellow cake mix
1/3 cup vegetable oil
1 egg
1 teaspoon grated lemon peel
Filling
2 packages (8 oz each) cream cheese, softened
3/4 cup sugar
3 containers (3.5 oz each) lemon pudding (from 4-pack container)
1/2 cup sour cream
3 eggs
2 cups frozen (thawed) whipped topping
  
Heat oven to 300°F. Spray bottom and side of 10-inch springform pan with baking spray with flour. Wrap foil around outside of pan to catch drips. Reserve 1/4 cup of the cake mix; set aside. In large bowl, beat remaining cake mix, oil, 1 egg and lemon peel with electric mixer on low speed until crumbly. Press in bottom and 1 1/2 inches up side of pan.

In same large bowl, beat reserved cake mix, the cream cheese, sugar, pudding and sour cream on medium speed until smooth and creamy. Beat in eggs, one at a time, until mixed. Pour over crust.
Bake 1 hour 20 minutes to 1 hour 35 minutes or until edges are set but center of cheesecake jiggles slightly when moved. Turn oven off; open oven door at least 4 inches. Leave cheesecake in oven 30 minutes longer.

Remove cheesecake from oven; place on cooling rack. Without releasing side of pan, run knife around edge of pan to loosen cheesecake. Cool in pan on cooling rack 30 minutes. Cover loosely; refrigerate 4 hours or overnight. Remove side of pan before serving. Pipe or spoon whipped topping around outside edge of cheesecake. Store in refrigerator. 


Raspberry Sauce
1 10-oz bag frozen raspberries
1 tsp. cornstarch
1 Tbsp. light corn syrup

Combine ingredients in a medium saucepan.  Bring to a boil.  Continue to boil for 2 minutes, stirring constantly.  Then remove from heat, cool, cover, and refrigerate.  

Serve on ice cream, toast, yogurt, or lemon cheesecake!  

Thursday, April 7, 2011

Cranberry Chicken

You know you've made a good dinner when your husband mentions how it was so good that he talked to a co-worker about it.  HA! I love it!

I don't think I'll ever be at a shortage for new recipes for dinners that I'll be eager to try.  But some recipes just gotta go on the repeat.  I think this is one of them.


Although it reminded me of Thanksgiving with the cranberry sauce and the meat, this is an excellent dish! The ingredients may seem like a strange combination, but trust me- the resulting flavor is fantastic!  It is loaded with wholesome goodness that Forrest (my hubby) and I devoured!


 Cranberry Chicken

3-4 chicken breasts
1 can whole berry cranberry sauce
1 pkg. chopped pecans
1 bottle Catalina dressing
1 pkg. dry onion soup mix

Place chicken in baking pan. Generously spread cranberry sauce over the chicken. Sprinkle pecans and onion soup mix over chicken. Pour catalina dressing over top. Bake lightly covered with foil at 350 for 45 minutes. Uncover and bake for 15 more minutes.

Tuesday, April 5, 2011

Mini Caramel Monkey Bread

Okay so I'll admit it.  I am on a bread/carb craze right now.  I made banana bread last week.  Made these monkey breads on Saturday.  Then on Sunday I devoured orange rolls made by my mom and amazing cinnamon rolls made by my mother-in-law.


And these monkey bread rolls..... they were AMAZING.


The "caramel" sauce of brown sugar and butter that you put at the bottom of the muffin pan (then is inverted onto the top of the roll- mine dried a little bit because I didn't take them out soon enough) is SO good!  These will definitely become a tradition in our new home for Saturday breakfasts.  My husband and I ate all of them throughout the day.  


Okay, so it actually only took a few hours.... I'll just blame it on my recent carb craze...


Mini Caramel Monkey Bread
from Pillsbury

 1/2 cup butter
1/2 cup brown sugar, packed
1/4 cup sugar
2 tsp cinnamon
2 7.5 cans Pillsbury buttermilk biscuits

Grease or spray 12 regular-size muffin cups.  Mix melted butter and brown sugar; spoon 1 tablespoon into each muffin cup.

Mix granulated sugar and cinnamon in a 1-gallon bag.  Separate dough into 20 biscuits; cut each into 6 pieces.  Shake pieces in bag to coat.  Place 10 pieces in each muffin cup.
Bake at 350 for 12-15 minutes, or until golden brown.  Cool 1 minute; turn upside down.  Serve warm.

Saturday, April 2, 2011

Not-Yo-Average Banana Bread

ALAS- my first recipe post in a while!  And to be continuously repeated.
To start, there are a few things I grew up eating that I don't think I could ever part with.  These recipes were courtesy of my lovely mother who can cook well and has her share of prized recipes that our family loves and requests.

1. My mom's apple crisp.  Seriously, NOTHING else compares.  It has the most amazing crumb topping that is to die for.  In fact, you can find that very crumb topping here- my blackberry-peach crisp is almost equally amazing.
2. Christmas morning breakfast casserole. 
3. Mom's delicious spaghetti- sooo meaty and good! I should post the recipe sometime...
4. Chocolate chip cookies. 'Nuff said.
5. My mom's BANANA bread!


I had forgotten how incredible this bread smells while baking in the oven.  It seemed just surreal that I was baking in my own, very kitchen in my own, very house!  And, with only my husband and I living here.... to eat two whole giant loaves of banana bread?!?


Luckily I visited my family that evening so I brought them a loaf... it was a huge hit, like always!
And my husband loved it too.  But then again, he loves anything that's put in front of him.


Banana Bread
Makes 3 large loaves

Combine in order:
6 ripe bananas mashed (the riper the better- I like them black), 4 eggs, 1 1/3 cup oil, 3 cups sugar, 2/3 cup sour cream.

Add:  4 cups flour, 1 1/2 tsp. salt, 2 1/2 tsp. soda, 2 tsp. vanilla, 2 cups chopped nuts (optional- I leave them out).

Pour into 3 greased and floured loaf pans.  Bake at 325 for 45 minutes- 1 hour or until toothpick comes out clean.  


Related Posts Plugin for WordPress, Blogger...