CLICK HERE FOR FREE BLOGGER TEMPLATES, LINK BUTTONS AND MORE! »
Showing posts with label healthy. Show all posts

Monday, May 6, 2013

Quinoa Black Bean Burrito Bowl

Underneath the generous helpings of salsa, sour cream, avocado and tomatoes here is a big bowl of cilantro-lime quinoa and yummy cilantro-infused cooked black beans topped with corn and cheese. 

Everything is mixed in here in this picture.  I am REALLY loving quinoa lately.  I've made several different recipes in the last few weeks and have loved them all!  I will be bringing them to the blog soon, kay? This was FABULOUS and I wish had a bowl of it sitting on my desk. right. now.

Quinoa Black Bean Burrito Bowl
from The Shiksa in the Kitchen
Yield: 4 servings


1 cup quinoa
1 tbsp olive oil
1/4 cup minced onion
1 clove garlic, minced
2 cans (15 oz each) black beans, rinsed and drained
1/4 cup chopped fresh cilantro
1/4 tsp chili powder (mild)
Pinch of cayenne pepper (spicy)
1/4 cup fresh lime juice
1 cup shredded lettuce
Salt

Optional toppings:
grated cheese
sour cream or greek yogurt
avocado
diced tomatoes
guacamole
corn 
pico de gallo or salsa
hot sauce or sriracha
guacamole


Rinse the quinoa in a sieve or mesh strainer under running water. Drain. Pour quinoa into a saucepan along with 2 cups of water. Bring the quinoa to a boil, then reduce heat to a low simmer. Cover the pot. Let the quinoa simmer for about 20 minutes till it becomes tender and all the liquid has been absorbed. Keep a close eye to make sure the quinoa doesn't burn.

While quinoa is cooking, heat 1 tbsp of oil in another saucepan over medium heat. Pour minced onion into the saucepan and saute for a few minutes till it softens and begins to turn brown. Add the minced garlic to the pot and let it saute for 1-2 minutes longer till aromatic.

Add the black beans to the pot of onions along with 1/2 cup water, 2 tbsp of chopped fresh cilantro, chili powder and cayenne pepper. Bring the beans to a boil, then reduce heat to medium low. Let the beans simmer for 15 minutes till the liquid is mostly evaporated. Stir in 2 tbsp of fresh lime juice. Season with salt to taste.

When the quinoa is fully cooked, remove from heat and fluff with a fork. Use the fork to mix in 2 tbsp of chopped cilantro and 2 tbsp fresh lime juice. Season with salt to taste.

Assemble your burrito bowls. Divide the cilantro lime quinoa between four bowls. Top each portion of quinoa with 1/4 cup of shredded lettuce, simmered black beans and optional toppings.  Serve warm.

Thursday, April 25, 2013

Unprocessing My Diet and Whole Wheat Waffles

So I will say first things first: I don't believe actual "diets" work.  As stated in my About Me page, people who lose substantial weight on popular diets (think Atkins, HCG, etc) almost always regain the weight within 5 years.  What works is a healthy lifestyle.  I DO believe in changing the way you eat to include more fruits, vegetables, and whole grains. These 3 things are the 3 categories of food that most people need to work on eating more of.

I've recently come upon the blog, 100 Days of Real Food.  Um wow, I can't stop reading through all of the posts.  A wife and mom of 2 kids decided to completely eliminate all processed foods from her family's diet.  At first it was a 100-day goal, but now they have continued this way of eating.  I've always known that it's best to limit processed food intake, but the more I read and the more I think of it, it really makes sense to eat hardly ANY of it.  The "American" diet is saturated with processed junk food like Cheez-its, donut holes, Oreos, Reeses'... and is made with unnatural and even harmful ingredients such as artificial coloring dyes, artificial flavorings, high fructose corn syrup, preservatives, and genetically-modified organisms.  The saying is true that says if you wouldn't find the ingredient in your pantry, then why should you be eating it?

Now that I have a daughter (she's 3 months old), I've really been re-thinking my approach toward nutrition.  I ate pretty healthy before, buying low-fat products and whole-wheat bread, rice and tortillas, while trying to include lots of fruits and vegetables.  But I don't think that's enough anymore.  There is a definite link between nutrition and diseases of the body; you truly are what you eat.  I have a healthy body, but what I eat now will determine my health in 30, 40, 50 years from now, and I want my daughter and other future children to grow up eating the most healthy foods possible with a love of nutrition like mine.  I want their risk of getting illnesses and nutrition-related diseases to be as low as possible, and I know that I can minimize that risk in my own home.

Now I'm not going ever going to be perfect.  I can't say I will never bake with all-purpose flour again (a true "real food" diet does not include any enriched flour) or that I will never eat an Oreo again. That is simply unrealistic.  However, I am going to do my best.  These are the things I am going to work on improving in mine and my family's diet:

1. I'm not going to buy any products with high-fructose corn syrup in it
2. The products I buy will have as few ingredients as possible (the more ingredients it has, the more processed it is)
3. I will bake with whole-grain flour and unrefined sweeteners such as honey, pure maple syrup and sucanat
4. I will try to purchase as many organic products as I can afford
5. I will try to make homemade versions of store-bought items (like BBQ sauce, chicken broth, granola, bread, etc.)
6. I will stop buying low-fat and fat-free products (this post and this post were both an eye-opener to me but after additional research it makes sense that low-fat products are not healthier and they add in extra preservatives and other chemicals that make the product unsafe and unhealthy!)
This will be an on-going journey that will take time to completely adjust to, but I'm feeling committed.  I want the best for my family.  I feel SO amazing when I feed my body healthy, whole, REAL foods.  I constantly think back to the diet of our ancestors- processed junk food did not exist and they ate REAL food! It is the food that God intended us to eat, I think! (I'm definitely NOT saying it is a sin to eat processed foods at all, just that unprocessed food is in or is as close to its God-given natural state).

Here are some additional posts from the 100 Days blog that were interesting and helpful in eating less processed food:
Why you should cut processed food
What exactly is "real food?"
10 common misconceptions about real food
Real food meal plan ideas
85 snack ideas

I am definitely going to make a serious effort in eating "real" food and cooking and baking with real ingredients.  I'm excited to start this lifelong journey.  On a final note for today, I have a real food recipe that I got from the same blog... 100 Days of Real Food: waffles.  These are 100% whole wheat, using white whole wheat flour.  It is a little lighter in texture than normal whole wheat flour but yet has the same nutritional benefits.  These waffles are husband approved! My husband loved them, although he did not love the pure maple syrup that I put on top of my own waffle; he opted for regular pancake syrup (the processed, high-fructose corn syrup kind!). I personally enjoy the fresh taste of 100% real maple syrup and even though it is much runnier than pancake syrup, it is still very sweet and yummy.


Whole Wheat Waffles
Makes 4-5 waffles

2 large eggs
1 ¾ cups milk (anything from skim milk to thick buttermilk should work)
¼ cup oil (I used coconut oil)
1 tablespoon honey
½ teaspoon ground cinnamon
¼ teaspoon baking soda
1 ½ cups whole-wheat flour (organic white whole-wheat flour works great)
2 teaspoons baking powder
⅛ teaspoon salt
Warmed 100% pure maple syrup for serving
Fresh fruit for serving
  1. Preheat your waffle iron.
  2. In a large mixing bowl whisk together the eggs, milk, oil, honey, cinnamon, and baking soda until well combined.
  3. Add in the flour, baking powder, and salt and whisk together just until the large lumps disappear.
  4. When the waffle iron is hot, dab it with a little butter and then ladle some batter onto the center of the iron. Follow the instructions that came with your waffle maker to know how long it should be cooked (mine takes about 3 – 4 minutes each).
  5. Keep waffles warm until you finish cooking all of them. Top with pure maple syrup and fruit. Enjoy!

Amazing Coconut Granola

Here's the deal. In my experience, homemade granola recipes just don't tend to be as crunchy and "cluster-y" as store-bought granola.  Am I right? Or is that just me?  I've tried several granola recipes before this one and none of them were up to par with my crunchy granola standards.  Except this one.  Holy wonderful it is the best darn granola I think I've ever eaten. Can't really tell in the picture, sorry I'm definitely no photographer.  But don't let the pic deter you from making this granola.  It's super easy, very healthy and amazingly delicious.


Coconut Granola
from Two Peas and Their Pod

2 cups old-fashioned oats
3/4 cup shredded sweetened coconut
1/2 cup chopped or sliced almonds
1/3 cup pepitas (raw pumpkin seeds) or sunflower seeds
2 tablespoons brown sugar
1 teaspoon cinnamon
1/4 teaspoon salt
4 tablespoons coconut oil, melted
1/2 cup pure maple syrup
1 teaspoon vanilla extract
1/4 teaspoon coconut extract

1. Preheat the oven to 300 degrees F. Line a large baking sheet with a Slipat or parchment paper. Set aside.
2. In a large bowl, combine oats, coconut, almonds, pepitas, brown sugar, cinnamon, and salt. In a small bowl, whisk together coconut oil, maple syrup, vanilla, and coconut extract. Pour liquid mixture over dry ingredients. Stir until dry ingredients are well-coated.
3. Pour the granola mixture onto the prepared baking sheet. Spread granola into an even layer. Bake for 30 minutes or until granola is golden brown, stirring every 10 minutes. Let granola cool completely. Store in an air-tight container for up to 1 month.
The only advice I'll give you is to not turn the oven temperature hotter than the recipe calls for, and don't increase the time it's in the oven because you think it's nowhere near done yet.  This was my case making batch #1.  It turned out black and unedible.  I was very upset because it was smelling INCREDIBLE! Well I made another batch a week or so later (had to re-stock my coconut and pepitas) and actually followed the directions.. it came out perfect! :)

Healthy Whole-Wheat Blueberry Muffins


I am totally on a muffin kick lately.  Yeah of course I love the buttery, streusel-y cinnamon-y muffins such as one would get at Costco or Starbucks or someplace like that... but these are NOT those muffins!  They are healthy with hardly any added sugar and are full of fiber.  Don't be turned away from the saturated fat in the nutrition facts.  It is from the coconut oil, however the saturated fat in coconut oil has been shown in studies to have no adverse effects in the body.  However, these are still pretty dang tasty! Perfect for breakfast or an afternoon snack.  I am loving making muffins lately to freeze and put in my husband's lunch to take to work.
These are 100% whole-wheat.  The recipe calls for only whole-wheat flour, but I used half whole-wheat, and half whole-wheat pastry flour.  The pastry flour adds a lighter texture since the whole-wheat tends to produce a heavier, denser baked good.  The original recipe, from the blog 100 Days of Real Food (all about eating zero processed foods- read it, it's great!), also has zero added sugar.  However I did sprinkle some brown sugar on top of each muffin before baking to add a little added sweetness.  I am glad I did! If you want even more sweetness, you could add maybe 1/4-1/2 cup of additional browns sugar to the batter.


Whole-Wheat Blueberry Muffins
adapted from 100 Days of Real Food
Yield: 12 muffins

3/4 cup white whole-wheat flour
3/4 cup whole-wheat pastry flour
1/2 tsp. salt
2 tsp. baking powder
1/8 tsp. nutmeg
1/4 tsp. cinnamon
2 eggs
1/4-1/3 cup honey
1 tsp. pure vanilla extract
1/4 cup coconut oil (or other oil)
3/4 cup apple juice or orange juice
1 cup frozen or fresh blueberries (or other fruit or nuts)

Heat oven to 400 degrees F.  In a large bowl with a fork or whisk, mix the flour, salt, baking powder, cinnamon and nutmeg.  Make a well (hole) in the center of the flour mixture and pour in eggs, honey, vanilla, oil and juice.  Mix the dry and wet ingredients together- do not overmix.  Add blueberries or other fruit.
Line muffin pan with liners or spray muffin pan with nonstick cooking spray and then fill 2/3 to 3/4 of the way full with batter.  Bake for 10-15 minutes or until toothpick comes out clean.  Serve warm or at room temperature or freeze some to eat later!

Nutrition Facts: (per muffin) 136 calories, 5.7g fat (4.3 sat. fat), 31mg cholesterol, 208mg sodium, 2.2g fiber, 8.5g sugar, 3.1g protein

Thursday, January 17, 2013

Roasted Garlic Chicken Noodle Soup

Okay, friends.  I realize that I took a LONG hiatus from the blogging world and am quite embarrassed about it.  But to be honest, I seriously have some pretty dang good excuses.

1.  I became a vegetarian/almost vegan for a few months, shortly after my last post.  I was very dedicated to this new lifestyle and was constantly researching it.  I was trying new vegan and vegetarian recipes, some of which were very yummy, and others which were slightly less memorable! :)  I felt like until I got the hang of this new lifestyle and got a good slew of recipes under my belt, that I wanted to avoid my blog, which consists of many recipes that are very far from being vegetarian.

2.  A couple months into my attempted "veganism,"  I got pregnant.  We are expecting our first baby, a baby girl, in two weeks from today!  I could not be any more excited.  But when that morning sickness struck me in the first trimester last summer, oh boy.  I couldn't even think about eating... anything.  My avid tries at successfully cooking vegan meals flopped- heck I probably stopped cooking ANYTHING for at least a month and a half due to being unable to walk in the kitchen without gagging.  I think I survived on bagels & cream cheese and crackers.  So nutritious; thank goodness for prenatals, right?  As my morning sickness started to fade, something I feared would happen, happened:  I wanted to eat meat.  But this was very gradual.  The thought of red meat and pork was still repulsive but I slowly warmed up to eating chicken again.  As I started to cook again, I mostly cooked meatless but would include a chicken dinner perhaps once a week.  Since then, I have gradually gone back to eating meat, however I still include many meatless meals for my husband and I and I still give props to anyone who is a vegetarian or vegan. It is HARD!  I'm sure this is not the end of my venture into that daring world.  This was actually the second time I ventured into vegetarianism, although this time lasted much longer than the first (which was only a couple weeks ha).

3.  The last few months I finished my undergrad degree at Arizona State University.  It was the toughest, busiest semester I've had in my college career, especially while being pregnant, but it was so worth it.  I now have my degree in Dietetics!  I am not a registered dietitian, however, as you must complete an internship and pass the national exam before receiving those credentials.  Right now that is not on my agenda as I'm becoming a mom in 2 weeks!  But I can see myself in the future pursuing something in the field of Nutrition.  I LOVE nutrition.  And I am a HUGE foodie (hence, this blog...).  P.S. I loved my major and encourage everyone to study nutrition, it is so fascinating and there is a TON more to it than just studying food.  In fact, you hardly study actual food at all.  There is a ton of science involved, as well as a management/business, medical terminology, medical nutrition therapy, and more! It is amazing :)

Anyway, I will get on to the fabulous recipe I made last week!  I found this Chicken soup recipe in a cookbook I got at our wedding, called "Bride and Groom: First and Forever Cookbook" by Mary Corpening Barber and Sara Corpening Whiteford.


Um, it is amazing!  I had never made homemade chicken noodle before, but I think I found a new favorite!  There is so much flavor here, mostly due to the roasted garlic.  The recipe calls for 1 Tablespoon of roasted garlic, the recipe of which is also included in the book, as I've included below.  Don't sub regular garlic, it won't be the same! Roasted garlic has AMAZING flavor and the aroma that stems from the oven while it's roasting is incredible!

Roasted Garlic Chicken Noodle Soup
Serves 4

1 T. vegetable oil
1 medium yellow onion, coarsely chopped
1 T. minced garlic
1/2 tsp. powdered chicken bouillon, or 1 small chicken bouillon cube, plus more as needed
1 tsp. chopped fresh thyme or 1/4 tsp. dried thyme
1/2 cup. white wine (I used water to sub)
6 cups chicken stock or canned low-sodium chicken broth
2 cups cooked, shredded chicken
2 medium carrots, peeled and roughly chopped
1 celery stalk, roughly chopped
2 ounces egg noodles
1 T. roasted garlic, homemade or purchased (see below for recipe)
1/4 c. chopped fresh flat-leaf parsley
freshly ground pepper

Heat oil in large heavy pot over medium heat.  Add the onion and garlic.  Add the 1/2 tsp. powdered bouillon (is using cube, add after the stock) and the thyme and cook, stirring frequently, until the onion is translucent, 5-7 minutes.  Add the wine (or water) and cook 2 minutes more.  Add the stock, the bouillon cube, if using, the chicken, carrots and celery.  Simmer until the vegetables are tender, 25 to 30 minutes.  Add the egg noodles and cook until tender, about 5 to 10 minutes.  Stir in the 1 T. roasted garlic and parsley.  Just before serving, season with pepper to taste, and add more powdered bouillon and roasted garlic if necessary.

*This recipe is best made at least 1 day in advance. It will keep refrigerated for 3 days and freezes great!  Allow the flavors to marry in the fridge for 1 day before serving.  (I did not do this, but the cookbook suggests this).


Whole Roasted Garlic
makes 1/3 cup  (I halved this recipe for the soup)

2 whole heads of garlic
1 Tablespoon of olive oil

Preheat the oven to 350.  Cut the top off each head of garlic, making a horizontal cut about 1 inch below the top.  Place the bottom halves on a large piece of aluminum foil and drizzle with the olive oil.  Place the tops on the bottom halves and fold the foil seal the garlic inside.  Bake until the garlic is light brown and very soft, 1 to 1 1/2 hours. Let cool slightly. 

To reserve garlic for later use, remove the cloves from the skins by squeezing the bottom of each clove.  Place in a bowl and mash with the back of a spoon.  The roasted garlic will keep, covered and refrigerated, for at least 2 weeks.

Thursday, March 22, 2012

Cheesy Sloppy Joes


Lately things have been tight financially for my hubby and I since my hubby is preparing to apply for dental school and we are both finishing up our last year as students at ASU.  However, I will never give up my passion and hobby known as cooking, no matter how tight money gets.  There are such things called inexpensive dinners, and this is one of them.  Plus, was pretty quick to put together and much better than sloppy joes made with Mamwich brand sauce that I grew up on!

Cheesy Sloppy Joes

  • 1 lb. ground beef
  • 1 green pepper, seeded and diced
  • 1 15 oz. can tomato sauce
  • 2 tsp minced onion
  • 1 tsp minced garlic
  • 1 tsp vinegar
  • 1 Tbsp prepared mustard
  • 1 Tbsp brown sugar
  • Salt and pepper
  • 4 whole wheat buns
  • 4 slices provolone cheese (in place of this I used shredded Monterey Jack and it worked great)
  • Brown the ground beef. (If you want softer green peppers, cook them with the ground beef.) Drain and let sit.
  • In the same skillet, add the tomato sauce, minced onion, minced garlic, vinegar, mustard and brown sugar. Stir and let simmer over low heat for 5 to 10 minutes.  Add the brown beef and (uncooked or cooked) green peppers and combine. Simmer over low heat for another 5 to 10 minutes, or until ready to serve.
  • Spoon the sloppy joe meat over the buns and top cheese. Let the warm sauce melt the cheese, or microwave.

Tuesday, March 20, 2012

Banana Nut Oatmeal Smoothie


I haven't really tried many smoothie recipes as I usually just rely on Jamba Juice when I get a smoothie craving.  HOWEVER, this smoothie was really impressive, super easy and healthy too.

I added about 1/2 tablespoons of chunky peanut butter to the original recipe, which I think added a bit more nuttiness and creaminess.  Delicious!

Banana Nut Oatmeal Smoothie
  • 2 whole ripe bananas (best with brown flecks on peel)
  • 2 cups Ice
  • 1/3 cup Yogurt - preferably Greek yogurt flavored with honey
  • 1/2 cup Cooked oatmeal  (I just cooked up a packet of plain Quaker oatmeal)
  • 1/3 cup Almonds 
  • 1/2 tablespoon peanut butter
Pour all ingredients in the blender, pouring in ice last.  Blend for about 30 seconds or until it is smooth.   Serves 2.

Monday, March 19, 2012

Slow Cooker Chicken Enchilada Soup


It's getting warmer here in Mesa and chili/soup season is almost over!  I'm almost a little sad about the cool weather disappearing... until I think of summer and all that it entails! I cannot wait for a break from school, the beach, swimming, baking yummy summer treats and eating ice cream of course!

But before you get ahead of yourself, go ahead and make this scrumptious soup from Jamie Cooks it Up!  She has an awesome blog and I definitely want to try more of her recipes.  This one is SO easy because you can throw it in the crock pot and can even use FROZEN chicken breasts! Now that is my style :)

Chicken Enchilada Soup

www.jamiecooksitup.blogspot.com
Time: 10 min. hands on + 4-6 hours crock pot cooking
Yield: 8 servings
Recipe adapted from Real Mom Kitchen

1 (14.5 ounce) can Mexican Style Stewed Tomatoes
2 (15 ounce) cans black beans
2 (15 ounce) cans corn
1/2 C onion, chopped
1/2 C red or green pepper, chopped
2 chicken breasts (I used frozen)
1 (10 ounce) can enchilada sauce
1 (10 ounce) can cream of chicken soup
2 1/2 C milk
4 bullion cubes (or 4 t bullion granules)
1/2 t lime juice (can be bottled)
1/3 C sour cream
2 T butter

Toppings:
Tortilla Chips
cheddar cheese
cilantro
avocado
 
1. Pour the whole can of stewed tomatoes into your crock pot, juice included. Diced tomatoes work best...but if you only have whole stewed tomatoes, like me :)...then stick some kitchen scissors into the pot and cut up your tomatoes.
2. Drain and rinse the black beans and add them to the pot.
3. Drain the corn and add them as well.
4. Roughly chop up 1/2 C onion and 1/2 C of red or green pepper and toss them in.
5. Pour the enchilada sauce into a medium sized mixing bowl. Add the cream of chicken soup, 2 1/2 C milk and then crumble the bullion cubes over the top.
6. Whisk it all together until nice and smooth.
7. Place two chicken breasts over the vegetables in your crock pot. (I used frozen)
8. Pour the sauce over the top of the chicken.
9. Cover your crock and cook on high for 4 hours or on low for 7-8, depending on how fast your crock pot cooks things.
10. Remove the chicken and place it on a plate. Shred it with a fork.
11. Add the 1/2 t lime juice, 1/3 C sour cream and 2 T butter to the soup. Whisk it in until the butter has melted and the sour cream is well combined.
12. Toss your chicken back into the pot, give it a stir and you are ready to eat.
Serve with tortilla chips and cheddar cheese. Cilantro and avocado are also fabulous.

Enjoy!


Tuesday, January 31, 2012

The Best Broccoli You'll Ever Have

So sometimes Pinterest is the best invention ever. I mean, you get to look at photos of the perfect house, perfect food, gorgeous girls with the perfect bodies in perfect clothes... what a great way to feel so uplifted about our own perfect lives, right?! Ha but no I really do enjoy it. I tried one of the recipes I pinned just a few days ago- it advertised that this was "the best broccoli you'll ever have..."

The best? I've never even had really good broccoli so I didn't have much to compare it to. BUT nevertheless I wanted to try it out since I had all the ingredients.

And... it is phenomenal!! Soo flavorful and crunchy and tart and sweet and just all around amazing. It will become a routine side dish for me for... ever.

Amazing Roasted Broccoli

1-2 heads of broccoli, cut into small parts
3-4 Tbsp. olive oil
1 1/2 tsp. salt
1/2 tsp. pepper
3-4 garlic cloves, sliced
zest of a lemon
juice of a lemon
3 Tbsp. pine nuts (optional)
1/3 cup freshly grated parmesan cheese (I used thinly grated Monterey Jack)

Preheat oven to 425. Now the key is to have SUPER dry broccoli. I didn't wash because I believe the high temperature of the oven will kill the bacteria... but if you do wash, then dry obsessively. Place on cookie sheet lined with foil. Toss with 3 Tbsp. olive oil, salt and pepper. Add garlic slices in with the broccoli. Roast in the oven for 20 to 25 minutes, until "crisp-tender and the tips of some florets are browned."

After you take it out, zest a lemon over the broccoli, and squeeze the juice over it as well. Add 1 more Tbsp. of olive oil, pine nuts, basil and cheese.

And enjoy!!!!

The second part of this picture (the chicken and rice will come later- this chicken recipe is not to miss!)

Healthy White Bean and Turkey Chili

Yeah so I realize this is only my first post of 2012! And on the very last day of January. Whoops. Can I just say that this month has literally been one of the most busy and emotionally draining I've had? Well, there ya go. It was. Personal reasons (and also very hectic college classes to blame). Well this recipe is realllly yummy and would be perfect for Superbowl dinner.

Plus it is very healthy! And, did I mention, delicious?!?

White Bean and Turkey Chili
from Skinnytaste

Servings: 14 • Serving Size: 1 cup
Calories: 211.5

cooking spray
2 small onions, chopped
5 garlic cloves
2 tsp chili powder, to your taste
1 bay leaf
1/2 tbsp cumin
1/2 tbsp oregano
2 tsp red pepper flakes (to taste)
3 lbs 99% lean ground turkey
4 16 oz cans of cannellini beans, rinsed and drained
2 cups of fat free chicken broth
1/2 cup of fat free sour cream
salt and pepper to taste

Heat a large heavy bottomed pot over medium flame. When hot, spray oil. Add onions, garlic, saute about 5 min. Add meat and cook, breaking it up until white, about 5 minutes. Add salt, chili powder, cumin, oregano, red pepper flakes and cook for 2 minutes. Add beans, broth, cook uncovered about 10 minutes.

Lower heat and cover, simmer about 45 minutes mixing occasionally. Add sour cream and cook 5 more minutes. Adjust seasoning and salt to taste.

Top with chopped red onion, chopped fresh cilantro, light sour cream, jalapeños and reduced fat cheddar if desired.

Tuesday, September 27, 2011

Slow Cooker Beef-Tortellini Soup


I am seriously in love with my slow cooker/crock pot (whatever you want to call it- I use both names.  Just whatever I feel like, mostly).  It is absolutely PERFECT on the busiest of days when you have about .552 seconds to make dinner.  Well hopefully you have more time than that, but you won't need much more ;)

I kinda cheated on this recipe because I didn't have celery (that wasn't wilted) or a can of green beans.  But even without those key ingredients, this soup was awesome! Perfect for the cooling weather. (I know, it was only what like 99 degrees today! Woo-hoo!)

My husband said he "liked it a lot" which really does indeed say a lot because he is usually a man of few words when it comes to food.  Usually I'll ask him if he likes what I made, secretly trying to get as much description out of him as possible but realistically knowing that that will never ever happen, and I'll usually get "It's good." if he likes it, "it's really good" if he loves it (I think that's a word for love?) and "It's not my favorite thing you've made" if he doesn't love it.  But being the wonderful husband he is, he will still eat it all and usually even eat seconds.  Man I just love husbands and their non-picky appetites! (Usually!)


Slow-Cooker Beef Tortellini Soup
from Pillsbury

Prep Time: 20 Min
Total Time: 8 Hr 45 Min
Makes: 6 servings


1 lb beef stew meat
1 large onion, chopped (3/4 cup)
1 large carrot, chopped (3/4 cup)
1 medium stalk celery, chopped (1/2 cup)
2 cloves garlic, finely chopped
2 teaspoons sugar
1 can (14.5 oz) diced tomatoes, undrained
2 cans (10 1/2 oz each) condensed beef consommé or beef broth
1 teaspoon dried basil leaves
2 cups frozen cheese-filled tortellini (I used spinach-ricotta filled from Trader Joe's)
1 cup frozen cut green beans (I'm sure you could substitute a can of green beans just perfectly)
1. In 3 1/2- to 4-quart slow cooker, add beef, onion, carrot, celery, garlic, sugar, tomatoes and beef consommé in order listed. 
2. Cover; cook on Low heat setting 8 to 9 hours. (I did not have this much time so I did the first two hours on low then the last 3 on high. You could probably do 4-5 hours on high instead, also)
3 About 25 minutes before serving, stir in basil, frozen tortellini and green beans. Increase heat setting to High. Cover; cook about 25 minutes or until beans are tender.
Nutritional Information: 1 Serving= 320 calories, 12g fat 

Monday, September 26, 2011

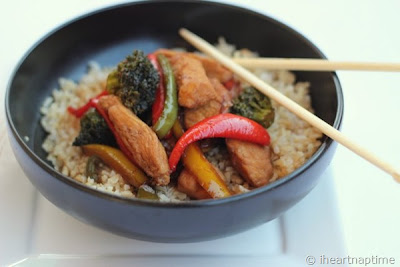
Chicken & Veggie Stir-Fry


I am seriously head-over-heels for Fall! It makes me so happy and if I had all the time in the world, I would spend a lot more of it in the kitchen making yummy fall treats and delicious food.  Oh, and it would all be calorie-free in my perfect world! ;)

There are so many yummy treats that I have bookmarked to make this fall/October/Halloween and I have no idea how I will find the time to make them all! But alas... I will do it! I have already made a couple DELICIOUS fall treats that I will post soon.  Seriously amazing... one has to do with pumpkin and the other has to do with apple.... shhh!

Anyway,  I absolutely LOVE this chicken and veggie stir-fry recipe for many reasons.

1. It is incredibly easy.
2. It is incredibly versatile.  You can add pretty much any veggies that you want.
3. It is incredibly delicious! My husband and I really, really enjoy this.
4. It is healthy! Lean protein matched with a plethora of vegetables and served over rice (to make it even healthier, use whole grain, brown rice- that's what I did and it was awesome.)

Perfect family meal for a busy weeknight!

Chicken & Vegetable Stir-Fry
recipe and photo from iheartnaptime.net

1 lb. chicken cut into strips
1/2 onion cut into strips
1-2 carrots cut into slices
1 red and yellow bell pepper
1 8 oz. can mushrooms
1 head broccoli
1-2 stalks celery, sliced
1 1/2 cups Teriyaki Marinade and Sauce (iheartnaptime recommends Yoshida's Gourmet Sauce but I used Safeway brand teriyaki sauce and it was fine)
Any extra veggies you want to add
1 cup rice

Heat a little olive oil in large Wok or frying pan.  Place chicken and all prepared veggies pan and cook over medium heat.  After a couple of minutes, pour sauce in and cook for 10-15 minutes over medium heat until chicken is done.  Serve over rice.

Tuesday, September 20, 2011

Grilled Chicken Margherita Pizzas


These grilled chicken Margherita pizzas are made using tortillas and they are awesome!!! There is so much flavor and both my husband and I thought they were so yummy and that these could go on our "list" of favorite meals.  Mm-mm!!

Grilled Chicken Margherita Pizzas
from Eat Better America

Prep Time: 35 min
Start to Finish: 35 min
makes: 4 pizzas
1/2  tablespoon olive oil
1clove garlic, finely chopped
2boneless skinless chicken breasts (about 8 oz) (or pre-cooked grilled chicken slices like Tyson's)
1/2teaspoon seasoned salt
4flour tortillas (8 inch) (recommend whole-wheat)
1/2cup finely shredded part-skim mozzarella cheese (2 oz)
2plum (Roma) tomatoes, thinly sliced (about 10 oz)
1/4cup sliced fresh basil leaves 

Heat gas or charcoal grill. In small bowl, mix oil and garlic. Brush chicken breasts with 1 teaspoon of the oil mixture; sprinkle with seasoned salt. Place on grill over medium-high heat. Cover grill; cook 12 to 18 minutes, turning once, until juice of chicken is clear when center of thickest part is cut (170°F). Reduce heat to medium-low.

On ungreased cookie sheets, place tortillas. Brush with remaining oil mixture. Cut chicken into strips. Arrange chicken strips over tortillas. Sprinkle each with 1/4 cup of the cheese. Top evenly with tomato slices; sprinkle with remaining cheese and basil.

With wide spatula, carefully slide pizzas onto grill over medium-low heat. Cover grill; cook 3 to 5 minutes, rotating pizzas to avoid hot spots, until cheese is melted and crusts are crisp. Slide pizzas back onto cookie sheets.             

1 pizza= 300 calories

Saturday, September 17, 2011

Low-Fat Chocolate Chip Zucchini Bread

Wow... I have become quite lazy with posting regularly! It's just been crazy around here with trying to keep up school work and working 3 part-time jobs... man it's just a little hectic to say the least.  But that definitely has not stopped me from cooking/baking at every opportunity that I've had!


I thought I would share one last "summer" recipe before the weather starts dropping. It's dropped 10 degrees here already! Oh wait- I live in AZ and it's still in the high 90's.... Anyway there is still an abundance of zucchini out there and this is a great, yummy zucchini bread recipe to try. 

It is a lighter recipe from Gina's Weight Watcher recipes but it is fabulous! Everyone that tried it agreed.  :)

Low-Fat Chocolate Chip Zucchini Bread
from Skinny Taste

Servings: 16 • Serving Size: 1 slice • Old Points: 3 pts • Points+: 4 pts
Calories: 147.5 • Fat: 4.1 g • Protein: 2.2 g • Carb: 29.9 g • Fiber: 1.7 g  Sugar: 17 g Sodium: 186.5 mg

  • 1 cup all purpose flour 
  • 1 cup white whole wheat flour (regular whole wheat flour would work)
  • 1/2 cup brown sugar (not packed)
  • 1-1/8 tsp baking soda
  • 1 tsp vanilla
  • 1/2 tsp salt
  • 1/2 cup chocolate chips
  • 1 large egg, beaten
  • 2 tbsp melted butter
  • 1 cup apple sauce
  • 1-1/2 cups shredded zucchini (not packed)

Preheat oven to 325°.
Combine flour, sugar, baking soda, and salt in a large bowl. Mix well.
Add chocolate chips and gently mix to combine.
In a medium bowl, mix egg, vanilla, melted butter, apple sauce and zucchini. Add to the flour mixture and stir until just blended. 
Pour batter into a large 9x5 inch loaf pan.
Bake at 325° for 45-55 minutes, or until a toothpick inserted in the center comes out clean. Cool for about 10 minutes. Remove loaf from pan and let it cool before slicing.

Wednesday, August 24, 2011

Banana Pecan Oatmeal Pancakes

These pancakes are a great staple breakfast to have in your home- low-fat, full of whole grain oats, high in fiber, and delicious!

I altered the recipe a little bit by mashing the banana instead of dicing it, and I did not serve banana slices on top.  I bet it would be awesome though.  YUM!


Recipe For Banana Almond Oatmeal Pancakes
Modified from an old family recipe

Ingredients
1 cup whole wheat flour
1 cup quick or rolled oats
1 tablespoon baking powder
1 teaspoon salt
1 egg
1 teaspoon cinnamon
1 tablespoon honey
1 to 1 1/2 cups vanilla soy milk (or skim milk) (depending on whether you like thin or thick pancakes)
1 banana, diced or mashed
Cooking spray for pan
1/4 cup almonds or pecans
1 banana, sliced
Directions
  1. In a bowl, mix the flour, oats, baking powder, salt, egg, cinnamon, and honey. Stir in the soy milk to the desired consistency. I like my pancakes to be neither too thin nor too thick, so I added 1 1/4 cups of soy milk. Stir in the bananas.
  2. Place a skillet on medium heat (I use a square-shaped griddle). After spraying the pan, pour batter into 4-inch diameter circles (using about 1/4 cup of batter).
  3. While the pancakes are cooking, hand chop the almonds on a cutting board with a sharp knife.
  4. Once the pancakes begin to bubble, flip them and cook for another minute or so on the other side until golden brown.
  5. Serve three pancakes with sliced bananas and chopped almonds. They're delicious like this, or for a sweeter breakfast, pour on two tablespoons of real maple syrup.
Makes 12 pancakes (four servings).


Tuesday, August 23, 2011

Spinach Lasagna Rolls

As much as I hesitate to admit it, I sometimes stay away from foods that have the word spinach in the title.  I don't necessarily hate the leafy green, but in order for me to eat it, it's gotta be surrounded by lots of other delicious ingredients! 

That being said... in NO way do I find this main dish even slightly unlike-able.  For one, it's a fabulous way to use up leftover lasagna noodles.  It's also incredibly cute- little rolls of lasagna filled with creamy, savory yummy goodness! Most importantly- these are delicious! I was so excited to eat the leftovers over the next few days!

I found this recipe linked to a recipe for a homemade sauce to use instead of store-bought.  I hesitated, but I ended up making the homemade and loved it!! I really think it was what made this meal so delicious~ yum!

Spinach Lasagna Rolls
 from Skinny Taste

Servings: 9 • Serving Size: 1 roll • Old Points: 4 pts • Points+: 6 ww pts
Calories: 224.9 • Fat: 5.1 g • Fiber: 3.4 g • Protein: 13.0 g • Carbs: 31.5

  • 9 lasagna noodles, cooked
  • 10 oz frozen chopped spinach, thawed and completely drained
  • 15 oz fat free ricotta cheese (I like Polly-o)
  • 1/2 cup grated Parmesan cheese
  • 1 egg
  • salt and fresh pepper
  • 32 oz tomato sauce
  • 9 tbsp (about 3 oz) part skim mozzarella cheese, shredded
Preheat oven to 350°. Combine spinach, ricotta, Parmesan, egg, salt and pepper in a medium bowl. Ladle about 1 cup sauce on the bottom of a 9 x 12 baking dish.

Place a piece of wax paper on the counter and lay out lasagna noodles. Make sure noodles are dry. Take 1/3 cup of ricotta mixture and spread evenly over noodle. Roll carefully and place seam side down onto the baking dish. Repeat with remaining noodles.

Ladle sauce over the noodles in the baking dish and top each one with 1 tbsp mozzarella cheese. Put foil over baking dish and bake for 40 minutes, or until cheese melts. Makes 9 rolls.

To serve, ladle a little sauce on the plate and top with lasagna roll.

Wednesday, August 10, 2011

Southwest Pasta Salad

Okay FINALLY I'm posting again! Ha it seems like I'll do really great at posting for a week or so, posting every day, and then all of a sudden I get super busy and don't post for a long time.  I really want to break this habit, I do... but I am just so stinkin busy all of the time! I barely have time to cook/bake the things I put on here!


However,  I did make this  fabulous pasta salad a few weeks ago... and it was SO good!! We brought it to a potluck dinner and it got many compliments.  My husband rated this as a "keeper."

Southwest Pasta Salad
Recipe by Our Best Bites

1/2 lb bowtie pasta
1 14oz can black beans, drained and rinsed
2 roma tomatoes, diced or about 3/4 C or halved cherry tomatoes
1 large red, yellow, or orange bell pepper, diced
1/2 C sliced green onions
1/2 C frozen fresh corn
zest from 2 limes
optional: 8 oz diced cooked chicken
1/2 C Queso Fresco or Cotija Cheese (or you could sub grated jack, cheddar or pepperjack)

Dressing:
6 Tbs fresh lime juice (about 3 juicy limes)
1/4 C white wine or rice vinegar
4-5 cloves garlic, roughly chopped
1 1/2 tsp chili powder
1 tsp cumin
1/2 tsp coriander
1/2 tsp kosher or sea salt
2 tsp sugar (add a touch more if your limes are extra sour/bitter)
3/4 C canola oil
1/2 C roughly chopped cilantro


Boil pasta in salted water until cooked.  While it’s cooking, prepare dressing.
First zest your limes and place the zest in a large salad bowl.
Place the lime juice, vinegar, garlic, chili powder, cumin, coriander, salt and sugar in a blender.  (Basically everything except the cilantro and oil)  Process until smooth.  With the motor running slowly, add the oil in a steady stream until incorporated.  Add the cilantro and pulse so it gets broken up, but some pieces still remain in tact.
When pasta is done cooking, drain and rinse immediately with cold water to cool.  Place the pasta in the large salad bowl with the lime zest.  Add black beans, tomatoes, diced pepper, green onions, corn (no need to thaw the corn),  and chicken if desired.  Toss with dressing.  Taste, and add additional salt and pepper to taste.  For best results, chill for 1 hour before serving.  Right before serving, sprinkle cheese on top.  Serve with extra lime wedges if desired.

Makes about 4-6 dinner sized servings or 10-12 side servings

Sunday, July 31, 2011

Basil Spaghetti with Cheesy Broiled Tomatoes


Men: beware.  This is total chick food.  Cheesy broiled tomatoes over garlicky, basil-y cheesy pasta?  Mmm-hmm.  Sounds like a perfect meal to me.  As for my husband?... He'd ask where the meat was.
Me?  Didn't miss it at all. This was great!

Basil Spaghetti with Cheesy Broiled Tomatoes 
From Noble Pig

12 ounces spaghetti
3 large beefsteak tomatoes (about 1-1/2 pounds), each cut into 4 thick slices
3 Tablespoons olive oil, plus more for the baking sheet
Kosher salt and black pepper
8 ounces mozzarella, grated
1/4 cup grated Parmesan
2 cloves garlic, minced
1/4 teaspoon crushed red pepper
3/4 cup torn fresh basil leaves & more for serving.

Heat broiler.  Cook the pasta according to the package directions; drain and return to pot.

Meanwhile, arrange the tomato slices in a single layer on a lightly oiled rimmed baking sheet.  Season with salt and pepper.  Dividing evenly, sprinkle the slices with the mozzarella and Parmesan.  Broil until the cheese is bubbly and golden, 3 to 5 minutes.

In a small saucepan, warm the oil with the garlic and red pepper over medium heat until fragrant, 1 to 2 minutes.

Add the garlic oil, basil, salt and pepper to the pasta and toss to combine.  Serve topped with tomatoes, additional basil and more Parmesan.

Tuesday, July 26, 2011

Creamy Alfredo Spaghetti with Asparagus


I will tell you right now that my husband just thought this was "okay."  He still ate it, of course (he's good enough to at least eat whatever I put in front of him) but it wasn't his favorite dish ever... probably because he is used to eating Olive Garden-style fettuccine alfredo.  And this recipe, my friend is lighter and healthier than Olive Garden-style fettuccine alfredo.


BUT, in my own opinion, I think it is no less delicious, just different.  But in a good way!  When you can appreciate the fact that you are eating a guilt-free version of one of the guiltiest dishes on this earth- that is a LOT to love!  Add in the fact that the taste really is fantastic (I recommend you don't compare it to another-style of fettuccine alfredo and just take it as it is) and you have a new favorite weeknight meal!

Lighter Alfredo Spaghetti with Roasted Asparagus
from Cooking Light

  • 2 cups 1% low-fat milk
  • 1/3 cup (3 ounces) 1/3-less-fat cream cheese
  • 2 tablespoons all-purpose flour
  • 1 teaspoon salt
  • 1 teaspoon butter
  • 3 garlic cloves, minced
  • 1 cup (4 ounces) grated Parmigiano-Reggiano cheese (or parmesan)
  • 1 pound asparagus, trimmed and cut into 2-inch pieces (about 2 cups)
  • Cooking spray
  • 8 ounces uncooked whole wheat spaghetti
  • 8 ounces uncooked spaghetti (or you can use 16 oz. either regular or whole-wheat spaghetti)
  • 2 tablespoons truffle oil or olive oil
  • 1/4 teaspoon freshly ground black pepper
Preparation
  • Preheat oven to 425°.
  • Combine first four ingredients in a blender; process until smooth.
  • Melt butter in a saucepan over medium-high heat. Add garlic; sauté 30 seconds. Add milk mixture to pan; cook 3 minutes or until mixture simmers, stirring constantly. Cook 2 minutes or until thickened, stirring constantly. Remove from heat; stir in cheese. Cover.
  • Place asparagus on jelly-roll pan coated with cooking spray. Bake at 425° 10 minutes or until browned, stirring once.
  • Cook both pastas according to package directions, omitting salt and fat; drain well.
  • Place pastas and asparagus in a large bowl. Add cheese mixture, tossing well. Add truffle oil and pepper; toss gently. Serve immediately.
Yields: 8 servings (serving size: 1 cup)

Nutritional Information: (per serving) 296 calories, 11.4g fat (5.2g saturated), 14.5g protein, 34.9g carbohydrate, 3.7g fiber

Thursday, July 21, 2011

Healthy Sweet Pork Salad

I know, I know, I know!  I have been seriously M.I.A.  But, for good reason.  Well okay, not really that good of a reason- I mean, it's summer after all.  Summer= no school and no school= less stress, right?
I wish! I have been busy with every little "here and there" errand and to-do task that has occupied my planner for months now.  And although it's been great and I have loved the break from school, I'm partially excited for it to start back up.  Just partially. 


 The other half of me is sad that I have no more vacations to go on.  Arkansas, Memphis, California and Mexico were my seasonal rounds of summer lovin' this year!  My new hubby and I took a week-long trip to visit the area where he served his LDS mission a couple of years ago- Little Rock, Arkansas, Memphis, Tennessee, and Southaven, Mississippi. It was AWESOME! I loved meeting all these people that he taught and loved and it was great to see how much they loved him as well.  Aww :) Also, the "Southern" culture is every bit as culturally unique as I imagined! And the southern cooking is downright dangerous!  I'll admit I came home with a couple extra you know what's....


But it's all good now... after a couple other short trips to Carlsbad and Rocky Point, I am beached-out (okay that's a lie, cause you can't really ever get enough of the beautiful Cali and Mexi beaches...).  I am home, and alive, and ready for the new school year, and back to a more regular cooking schedule!

To compensate for the little extra weight I picked up in the South, I have been eating super healthy since I returned.  This recipe I'm about to share is a perfect no-guilt recipe makeover for those super fatty SWEET PORK SALADS at CAFE RIO AND COSTA VIDAS!!!  Seriously, those salads are one of my weaknesses.  SO. GOOD.  This recipe is comprised of 3 recipes... one for the cilantro-lime rice (which, by the way is the best rice I have ever, ever had.  Even when eaten alone.), the sweet pork, and the salad itself.  You need to try it!


Slow Cooked Sweet Barbacoa Pork
Gina's Weight Watcher Recipes
Servings: about 10 • Serving Size: 3 oz • Old Points: 4.5 pts • Points+: 5 pts
Calories: 202.5 • Fat: 6.3 g • Protein: 26.2 g • Carb: 11.5 g • Fiber: 0.6 g

Adapted from Favorite Family Recipes

Marinade:
  • 2.5 lbs pork loin roast, all fat trimmed
  • salt and pepper
  • garlic powder
  • 6 oz Coke zero
  • 1/4 cup brown sugar (unpacked)
  • 1/4 cup water
Step 2
  • 8 oz Coke zero
  • 6 oz can sliced green chilies
  • 8 oz tomato sauce
  • 1 chipotle chile in adobo sauce
  • 1/8 tsp garlic powder
  • 1/8 tsp cumin
  • 1/8 tsp chipotle chili powder (to taste)
  • salt and pepper to taste
  • 1/3 cup brown sugar (unpacked)

Season pork with salt, pepper and garlic powder and place in the crock pot. Add 6 oz of coke and 1/4 cup of brown sugar. Marinate refrigerated for a few hours or overnight turning meat at least once while marinating.

Remove crock from refrigerator, add water, and cook on high for about 3-4 hours (or until it shreds easily). Remove pork from crock pot and discard any liquid left in the pot. Shred pork with two forks.

Step two: In the crock pot, combine 8 oz coke, green chilies, tomato sauce, chipotle chile, garlic powder, cumin, chipotle chili powder and remaining brown sugar.

Put shredded pork back in the crock pot and combine with sauce. Adjust salt and pepper to taste, cover and cook on high 1-1/2 hours more.


Cilantro-Lime Rice
  • 1 cup long grain white or brown rice
  • 2 cups water
  • 1 teaspoon chicken bouillon granules
  • 2 tablespoons fresh lime juice
  • 2 tablespoons chopped fresh cilantro
  • salt to taste
  1. Bring the rice, water, and chicken bouillon to a boil in a saucepan over high heat. Reduce heat to medium-low, cover, and simmer until the rice is tender, 20 to 25 minutes. Remove from the heat, add the lime juice, cilantro, and salt; fluff with a fork and serve.
Nutrition Per Serving:  Calories: 115 | Total Fat: 0.3g | Cholesterol: < 1mg


Once I had the pork and rice made up, I also made a pico de gallo (you could substitute salsa), and put everything together to create a salad with lettuce, corn, black beans and fat-free sour cream added in addition to the pork and rice!  Delish!

Related Posts Plugin for WordPress, Blogger...