CLICK HERE FOR FREE BLOGGER TEMPLATES, LINK BUTTONS AND MORE! »
Showing posts with label vegetables. Show all posts

Monday, May 6, 2013

Quinoa Black Bean Burrito Bowl

Underneath the generous helpings of salsa, sour cream, avocado and tomatoes here is a big bowl of cilantro-lime quinoa and yummy cilantro-infused cooked black beans topped with corn and cheese. 

Everything is mixed in here in this picture.  I am REALLY loving quinoa lately.  I've made several different recipes in the last few weeks and have loved them all!  I will be bringing them to the blog soon, kay? This was FABULOUS and I wish had a bowl of it sitting on my desk. right. now.

Quinoa Black Bean Burrito Bowl
from The Shiksa in the Kitchen
Yield: 4 servings


1 cup quinoa
1 tbsp olive oil
1/4 cup minced onion
1 clove garlic, minced
2 cans (15 oz each) black beans, rinsed and drained
1/4 cup chopped fresh cilantro
1/4 tsp chili powder (mild)
Pinch of cayenne pepper (spicy)
1/4 cup fresh lime juice
1 cup shredded lettuce
Salt

Optional toppings:
grated cheese
sour cream or greek yogurt
avocado
diced tomatoes
guacamole
corn 
pico de gallo or salsa
hot sauce or sriracha
guacamole


Rinse the quinoa in a sieve or mesh strainer under running water. Drain. Pour quinoa into a saucepan along with 2 cups of water. Bring the quinoa to a boil, then reduce heat to a low simmer. Cover the pot. Let the quinoa simmer for about 20 minutes till it becomes tender and all the liquid has been absorbed. Keep a close eye to make sure the quinoa doesn't burn.

While quinoa is cooking, heat 1 tbsp of oil in another saucepan over medium heat. Pour minced onion into the saucepan and saute for a few minutes till it softens and begins to turn brown. Add the minced garlic to the pot and let it saute for 1-2 minutes longer till aromatic.

Add the black beans to the pot of onions along with 1/2 cup water, 2 tbsp of chopped fresh cilantro, chili powder and cayenne pepper. Bring the beans to a boil, then reduce heat to medium low. Let the beans simmer for 15 minutes till the liquid is mostly evaporated. Stir in 2 tbsp of fresh lime juice. Season with salt to taste.

When the quinoa is fully cooked, remove from heat and fluff with a fork. Use the fork to mix in 2 tbsp of chopped cilantro and 2 tbsp fresh lime juice. Season with salt to taste.

Assemble your burrito bowls. Divide the cilantro lime quinoa between four bowls. Top each portion of quinoa with 1/4 cup of shredded lettuce, simmered black beans and optional toppings.  Serve warm.

Thursday, May 2, 2013

Slow Cooker BBQ Chicken Cobb Salad


  Alright so I totally failed at starting a new blog.  I guess I admit I'm a little embarrassed.  You see, I was kinda hoping that this fresh start would inspire and motivate me to regularly blog since I was starting at square one.  That, plus a lot of the posts on this here blog were old and not very well written and consisted of weird formatting... blah blah.  But then I came to realize that this blog still has a ton of recipes that I love and will always come back to... and so what if the writing is a little immature? So what if a bunch of the recipes were posted in 2010?  This blog is me and it's just a fun outlet for me to write about food that I love.  Ha sounds a little cheesy.  

I'm not gonna stick to any set posting schedule, I'm just gonna post about recipes that I've made and both my husband and I have loved when I get the chance.  I don't post anything on here that (at least) I haven't loved! My husband is a little bit pickier than I am when it comes to healthier foods but he will still eat anything I put in front of him.  I always make sure to get his opinion on everything I make because his is a different perspective than mine.  I have very broad taste buds; I love trying new things whereas my husband already knows what he likes- and that's what he wants. 

This here recipe is super yum!  It's made in a slow cooker, so it's super easy.  I altered it a bit and made a homemade BBQ sauce instead of buying the bottled kind.  You can find that homemade recipe here.  I used one whole recipe for the chicken, but you could probably get away with halving it.  I had a lot of leftover sauce in the crock pot.

Slow Cooker BBQ Chicken Cobb Salad
adapted from Six Sisters' Stuff
Makes about 6 large salads

5 chicken breasts
1 recipe homemade BBQ sauce or 18 oz. bottle BBQ sauce
12 cups chopped Romaine lettuce
2 avocados, diced
3 Roma tomatoes, diced
1 green pepper, chopped
2 carrots, thinly sliced
6 slices of bacon, cooked and crumbled
3 hard-boiled eggs, diced
2 cups cheddar cheese

Other toppings you might want to add: cucumbers, red onion, green onion, bleu cheese . . . the possibilities are endless!

Directions:
Spray the inside of your crock pot with non-stick cooking spray. Place chicken breasts inside and pour the bottle of barbecue sauce on top. Cover with lid and cook on low for 4-5 hours (or high for about 2 1/2 hours). Take chicken out of slow cooker and cut into bite-sized pieces.
Once chicken is cut, assemble your salads. Place about 2 cups of lettuce on the bottom of your plate and top with the vegetables/toppings of your choice. Top salad with your favorite salad dressing (Ranch, Italian, Thousand Island- whatever you want! I prefer Ranch)

Thursday, April 25, 2013

Vegetable Lime Chickpea Chili


K what is up with the Arizona weather lately? Seriously three days ago it was 60 degrees and now this week it's forecasted to get into the 90's.  What the what? Not to mention it snowed a couple weeks ago! Snow in Arizona. Fur-real. Anyways I'm kinda bummed because chili and soup is technically a lot yummier to eat and more appropriate when it is at least slightly chilly outside.  And now the weather has (almost) screwed up my plans to give you this great recipe.  'Cause I figure that guess what? This will still taste just as good in 80 degree weather as it will in 50 degree weather. No warm spell is gonna bring me down! Anddd maybe, just maybe, you are actually somewhere where it IS still chilly! Yay for you!  But, seriously, this chickpea chili is very fabulous at any time of the year.  My meat-loving husband loved it in all its veggie glory.  I have an idea- if it is warm where you are (like AZ) simply blast your AC to winter conditions.  (Oh my husband would just LOVE that!) Then enjoy this soup? Sounds good to me.

Vegetable Lime Chickpea Chili
from the Picky Palate cookbook, published on Two Peas and Their Pod
Yield: 6-8 servings

2 tablespoons extra-virgin olive oil
1 1/2 cups finely chopped white onion
1 1/2 cups chopped zucchini
1 1/2 cups yellow squash
1 cup chopped mini sweet peppers (I just chopped one red bell pepper)
1 8-ounce package baby bella mushrooms, sliced
2 tablespoons minced garlic
2 15-ounce cans chickpeas, drained and rinsed
1 28-ounce can diced tomatoes
2 cups vegetable broth
1/2 cup chopped fresh cilantro leaves
3 tablespoons lime juice
2 teaspoons ground cumin
1 teaspoon chili powder
1 teaspoon kosher salt
1/2 teaspoon freshly ground black pepper
Optional: shredded cheese and sour cream as toppings

Heat the olive oil in a Dutch oven or large pot over medium heat. Add the onion, zucchini, yellow squash, sweet peppers, and baby bells and cook, stirring, until tender, 5-8 minutes. Add the garlic and cook, stirring, for 1 minute. Add the chickpeas, tomatoes, broth, cilantro, lime juice, cumin, chili powder, salt, and pepper, stir to combine and cook until hot, about 5 minutes. Reduce the heat to low and simmer until ready to serve. Top with cheese and sour cream if desired.

Nutrition Facts: (1/6 of recipe) 265 calories, 6.5g fat (0.9g saturated), 1513mg sodium, 11g fiber, 10g protein

Thursday, January 17, 2013

Roasted Garlic Chicken Noodle Soup

Okay, friends.  I realize that I took a LONG hiatus from the blogging world and am quite embarrassed about it.  But to be honest, I seriously have some pretty dang good excuses.

1.  I became a vegetarian/almost vegan for a few months, shortly after my last post.  I was very dedicated to this new lifestyle and was constantly researching it.  I was trying new vegan and vegetarian recipes, some of which were very yummy, and others which were slightly less memorable! :)  I felt like until I got the hang of this new lifestyle and got a good slew of recipes under my belt, that I wanted to avoid my blog, which consists of many recipes that are very far from being vegetarian.

2.  A couple months into my attempted "veganism,"  I got pregnant.  We are expecting our first baby, a baby girl, in two weeks from today!  I could not be any more excited.  But when that morning sickness struck me in the first trimester last summer, oh boy.  I couldn't even think about eating... anything.  My avid tries at successfully cooking vegan meals flopped- heck I probably stopped cooking ANYTHING for at least a month and a half due to being unable to walk in the kitchen without gagging.  I think I survived on bagels & cream cheese and crackers.  So nutritious; thank goodness for prenatals, right?  As my morning sickness started to fade, something I feared would happen, happened:  I wanted to eat meat.  But this was very gradual.  The thought of red meat and pork was still repulsive but I slowly warmed up to eating chicken again.  As I started to cook again, I mostly cooked meatless but would include a chicken dinner perhaps once a week.  Since then, I have gradually gone back to eating meat, however I still include many meatless meals for my husband and I and I still give props to anyone who is a vegetarian or vegan. It is HARD!  I'm sure this is not the end of my venture into that daring world.  This was actually the second time I ventured into vegetarianism, although this time lasted much longer than the first (which was only a couple weeks ha).

3.  The last few months I finished my undergrad degree at Arizona State University.  It was the toughest, busiest semester I've had in my college career, especially while being pregnant, but it was so worth it.  I now have my degree in Dietetics!  I am not a registered dietitian, however, as you must complete an internship and pass the national exam before receiving those credentials.  Right now that is not on my agenda as I'm becoming a mom in 2 weeks!  But I can see myself in the future pursuing something in the field of Nutrition.  I LOVE nutrition.  And I am a HUGE foodie (hence, this blog...).  P.S. I loved my major and encourage everyone to study nutrition, it is so fascinating and there is a TON more to it than just studying food.  In fact, you hardly study actual food at all.  There is a ton of science involved, as well as a management/business, medical terminology, medical nutrition therapy, and more! It is amazing :)

Anyway, I will get on to the fabulous recipe I made last week!  I found this Chicken soup recipe in a cookbook I got at our wedding, called "Bride and Groom: First and Forever Cookbook" by Mary Corpening Barber and Sara Corpening Whiteford.


Um, it is amazing!  I had never made homemade chicken noodle before, but I think I found a new favorite!  There is so much flavor here, mostly due to the roasted garlic.  The recipe calls for 1 Tablespoon of roasted garlic, the recipe of which is also included in the book, as I've included below.  Don't sub regular garlic, it won't be the same! Roasted garlic has AMAZING flavor and the aroma that stems from the oven while it's roasting is incredible!

Roasted Garlic Chicken Noodle Soup
Serves 4

1 T. vegetable oil
1 medium yellow onion, coarsely chopped
1 T. minced garlic
1/2 tsp. powdered chicken bouillon, or 1 small chicken bouillon cube, plus more as needed
1 tsp. chopped fresh thyme or 1/4 tsp. dried thyme
1/2 cup. white wine (I used water to sub)
6 cups chicken stock or canned low-sodium chicken broth
2 cups cooked, shredded chicken
2 medium carrots, peeled and roughly chopped
1 celery stalk, roughly chopped
2 ounces egg noodles
1 T. roasted garlic, homemade or purchased (see below for recipe)
1/4 c. chopped fresh flat-leaf parsley
freshly ground pepper

Heat oil in large heavy pot over medium heat.  Add the onion and garlic.  Add the 1/2 tsp. powdered bouillon (is using cube, add after the stock) and the thyme and cook, stirring frequently, until the onion is translucent, 5-7 minutes.  Add the wine (or water) and cook 2 minutes more.  Add the stock, the bouillon cube, if using, the chicken, carrots and celery.  Simmer until the vegetables are tender, 25 to 30 minutes.  Add the egg noodles and cook until tender, about 5 to 10 minutes.  Stir in the 1 T. roasted garlic and parsley.  Just before serving, season with pepper to taste, and add more powdered bouillon and roasted garlic if necessary.

*This recipe is best made at least 1 day in advance. It will keep refrigerated for 3 days and freezes great!  Allow the flavors to marry in the fridge for 1 day before serving.  (I did not do this, but the cookbook suggests this).


Whole Roasted Garlic
makes 1/3 cup  (I halved this recipe for the soup)

2 whole heads of garlic
1 Tablespoon of olive oil

Preheat the oven to 350.  Cut the top off each head of garlic, making a horizontal cut about 1 inch below the top.  Place the bottom halves on a large piece of aluminum foil and drizzle with the olive oil.  Place the tops on the bottom halves and fold the foil seal the garlic inside.  Bake until the garlic is light brown and very soft, 1 to 1 1/2 hours. Let cool slightly. 

To reserve garlic for later use, remove the cloves from the skins by squeezing the bottom of each clove.  Place in a bowl and mash with the back of a spoon.  The roasted garlic will keep, covered and refrigerated, for at least 2 weeks.

Tuesday, January 31, 2012

The Best Broccoli You'll Ever Have

So sometimes Pinterest is the best invention ever. I mean, you get to look at photos of the perfect house, perfect food, gorgeous girls with the perfect bodies in perfect clothes... what a great way to feel so uplifted about our own perfect lives, right?! Ha but no I really do enjoy it. I tried one of the recipes I pinned just a few days ago- it advertised that this was "the best broccoli you'll ever have..."

The best? I've never even had really good broccoli so I didn't have much to compare it to. BUT nevertheless I wanted to try it out since I had all the ingredients.

And... it is phenomenal!! Soo flavorful and crunchy and tart and sweet and just all around amazing. It will become a routine side dish for me for... ever.

Amazing Roasted Broccoli

1-2 heads of broccoli, cut into small parts
3-4 Tbsp. olive oil
1 1/2 tsp. salt
1/2 tsp. pepper
3-4 garlic cloves, sliced
zest of a lemon
juice of a lemon
3 Tbsp. pine nuts (optional)
1/3 cup freshly grated parmesan cheese (I used thinly grated Monterey Jack)

Preheat oven to 425. Now the key is to have SUPER dry broccoli. I didn't wash because I believe the high temperature of the oven will kill the bacteria... but if you do wash, then dry obsessively. Place on cookie sheet lined with foil. Toss with 3 Tbsp. olive oil, salt and pepper. Add garlic slices in with the broccoli. Roast in the oven for 20 to 25 minutes, until "crisp-tender and the tips of some florets are browned."

After you take it out, zest a lemon over the broccoli, and squeeze the juice over it as well. Add 1 more Tbsp. of olive oil, pine nuts, basil and cheese.

And enjoy!!!!

The second part of this picture (the chicken and rice will come later- this chicken recipe is not to miss!)

Monday, October 17, 2011

Pioneer Woman's Breakfast Burritos

Here's my picture:

Here's her picture:

Umm. Let's just pretend I took both, okay? But for real, this is PIONEER WOMAN we are talking about here.  The first here recipe of hers that I've tried and LOVED!

If you are unfamiliar with Pioneer Woman, just google her.  Or turn on the Food Network because she and her ranch family have made their debut on the small screen now, too.  She is known for her love affair with butter and more butter and/or cheese but her recipes just all seem like true comfort food at its finest.  And these were the very best breakfast burritos I have ever had.  My husband, who adores anything with eggs and/or burritos also agreed.

This recipe is in Pioneer Woman's, otherwise known as Ree Drummond's, cookbook that I got at my wedding.  When I am bored I will pull out that cookbook and just drool over the pictures and recipes.  If only food that food had zero calories, right?  Sigh...

Her recipe calls for her breakfast potatoes, which recipe I included.  However, I didn't have time to cook potatoes so I just used about 1 1/2 cups or so of frozen hash browns.  They were even shredded.  But it still turned out fabulous!

 Breakfast Burritos  

(can easily half this recipe- calls for making 12 servings but I halved and it made about 5 burritos,) from The Pioneer Woman

Ingredients

  • 1 whole Recipe Of Ree's Basic Breakfast Potatoes* or 1 1/2 cups frozen hashbrowns
  • 1 pound Breakfast Sausage
  • 2 red bell peppers, seeded and roughly chopped
  • 10 whole Eggs
  • 1 teaspoon seasoned salt, such as Lawry's
  • black pepper to taste
  • 1/4 cup half-and-half (I used 2% milk)
  • 2 Tbsp. chopped fresh chives
  • 2 cups grated Monterey Jack Cheese
  • Flour Tortillas
  • picante sauce

Preparation Instructions

1. Begin by browning the breakfast sausage over medium heat. Drain off grease and reduce the heat to low.  Next, add the Basic Breakfast Potatoes and red bell peppers and stir to combine.  Cook over low heat for 5 minutes, stirring occasionally.
2. Crack the eggs into a bowl.  Add the seasoned salt, pepper, half-and-half and whisk to beat the eggs lightly.  
3. Add the chives and Monterey Jack and stir to combine.
4. With the heat still on low, pour the egg mixture over the sausage/potato mixture.
5. Now, with a spoon or spatula, very gently stir the mixture.  The potatoes will break apart if you stir too much, so go easy.
6. Continue lightly cooking over low heat until eggs are set.
7. Now taste and adjust the seasonings, adding more seasoned salt, pepper or cheese if desired.
8. To assemble, warm the stack of tortillas in the microwave for about 30 seconds.  Place a heaping spoonful of egg mixture into the middle of a warm tortilla.  Add more cheese if desired.
9. Tuck in the sides, then roll the tortilla until closed.  
10.  Wrap in foil sheets and keep warm until ready to serve.  Serve with picante sauce.


Basic Breakfast Potatoes

Ingredients

  • 4 whole (to 5) Large Red Potatoes
  • 1 whole Onion
  • 1 Tablespoon Vegetable Or Canola Oil
  • 1 Tablespoon Bacon Fat (optional)
  • Salt And Pepper, to taste
  • Red And Green Bell Peppers, Diced (optional)

Preparation Instructions

Place potatoes in a large pot and cover entirely with water. Bring to a boil and cook until potatoes are fork tender. (Or place potatoes on a baking sheet in a 375 degree F oven for 34 minutes or until fork tender.) When they are ready, place the potatoes on a cutting board and dice them into 1-inch pieces.
Next cut up an onion into a large, rough dice.
In a large skillet heat oil and bacon fat over medium-low heat. Put the onions in the skillet and sauté until they start to turn brown. (You can also use red and green bell peppers diced up. If you do, throw them in at this point).
Next, throw in the diced potatoes. Stir well and then slightly press/pack then. Now you will cook them without stirring for several minutes. You want the pan to be hot enough to crisp the potatoes but not hot enough to char them. (Optional step: sprinkle a bit of flour over potatoes as they cook). Cook for several minutes and then flip them with a spatula. Salt and Pepper them as they cook. Cook until desired brownness.

Tuesday, September 27, 2011

Slow Cooker Beef-Tortellini Soup


I am seriously in love with my slow cooker/crock pot (whatever you want to call it- I use both names.  Just whatever I feel like, mostly).  It is absolutely PERFECT on the busiest of days when you have about .552 seconds to make dinner.  Well hopefully you have more time than that, but you won't need much more ;)

I kinda cheated on this recipe because I didn't have celery (that wasn't wilted) or a can of green beans.  But even without those key ingredients, this soup was awesome! Perfect for the cooling weather. (I know, it was only what like 99 degrees today! Woo-hoo!)

My husband said he "liked it a lot" which really does indeed say a lot because he is usually a man of few words when it comes to food.  Usually I'll ask him if he likes what I made, secretly trying to get as much description out of him as possible but realistically knowing that that will never ever happen, and I'll usually get "It's good." if he likes it, "it's really good" if he loves it (I think that's a word for love?) and "It's not my favorite thing you've made" if he doesn't love it.  But being the wonderful husband he is, he will still eat it all and usually even eat seconds.  Man I just love husbands and their non-picky appetites! (Usually!)


Slow-Cooker Beef Tortellini Soup
from Pillsbury

Prep Time: 20 Min
Total Time: 8 Hr 45 Min
Makes: 6 servings


1 lb beef stew meat
1 large onion, chopped (3/4 cup)
1 large carrot, chopped (3/4 cup)
1 medium stalk celery, chopped (1/2 cup)
2 cloves garlic, finely chopped
2 teaspoons sugar
1 can (14.5 oz) diced tomatoes, undrained
2 cans (10 1/2 oz each) condensed beef consommé or beef broth
1 teaspoon dried basil leaves
2 cups frozen cheese-filled tortellini (I used spinach-ricotta filled from Trader Joe's)
1 cup frozen cut green beans (I'm sure you could substitute a can of green beans just perfectly)
1. In 3 1/2- to 4-quart slow cooker, add beef, onion, carrot, celery, garlic, sugar, tomatoes and beef consommé in order listed. 
2. Cover; cook on Low heat setting 8 to 9 hours. (I did not have this much time so I did the first two hours on low then the last 3 on high. You could probably do 4-5 hours on high instead, also)
3 About 25 minutes before serving, stir in basil, frozen tortellini and green beans. Increase heat setting to High. Cover; cook about 25 minutes or until beans are tender.
Nutritional Information: 1 Serving= 320 calories, 12g fat 

Monday, September 26, 2011

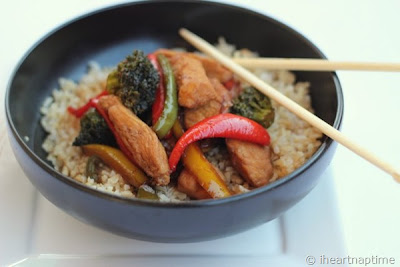
Chicken & Veggie Stir-Fry


I am seriously head-over-heels for Fall! It makes me so happy and if I had all the time in the world, I would spend a lot more of it in the kitchen making yummy fall treats and delicious food.  Oh, and it would all be calorie-free in my perfect world! ;)

There are so many yummy treats that I have bookmarked to make this fall/October/Halloween and I have no idea how I will find the time to make them all! But alas... I will do it! I have already made a couple DELICIOUS fall treats that I will post soon.  Seriously amazing... one has to do with pumpkin and the other has to do with apple.... shhh!

Anyway,  I absolutely LOVE this chicken and veggie stir-fry recipe for many reasons.

1. It is incredibly easy.
2. It is incredibly versatile.  You can add pretty much any veggies that you want.
3. It is incredibly delicious! My husband and I really, really enjoy this.
4. It is healthy! Lean protein matched with a plethora of vegetables and served over rice (to make it even healthier, use whole grain, brown rice- that's what I did and it was awesome.)

Perfect family meal for a busy weeknight!

Chicken & Vegetable Stir-Fry
recipe and photo from iheartnaptime.net

1 lb. chicken cut into strips
1/2 onion cut into strips
1-2 carrots cut into slices
1 red and yellow bell pepper
1 8 oz. can mushrooms
1 head broccoli
1-2 stalks celery, sliced
1 1/2 cups Teriyaki Marinade and Sauce (iheartnaptime recommends Yoshida's Gourmet Sauce but I used Safeway brand teriyaki sauce and it was fine)
Any extra veggies you want to add
1 cup rice

Heat a little olive oil in large Wok or frying pan.  Place chicken and all prepared veggies pan and cook over medium heat.  After a couple of minutes, pour sauce in and cook for 10-15 minutes over medium heat until chicken is done.  Serve over rice.

Wednesday, August 10, 2011

Southwest Pasta Salad

Okay FINALLY I'm posting again! Ha it seems like I'll do really great at posting for a week or so, posting every day, and then all of a sudden I get super busy and don't post for a long time.  I really want to break this habit, I do... but I am just so stinkin busy all of the time! I barely have time to cook/bake the things I put on here!


However,  I did make this  fabulous pasta salad a few weeks ago... and it was SO good!! We brought it to a potluck dinner and it got many compliments.  My husband rated this as a "keeper."

Southwest Pasta Salad
Recipe by Our Best Bites

1/2 lb bowtie pasta
1 14oz can black beans, drained and rinsed
2 roma tomatoes, diced or about 3/4 C or halved cherry tomatoes
1 large red, yellow, or orange bell pepper, diced
1/2 C sliced green onions
1/2 C frozen fresh corn
zest from 2 limes
optional: 8 oz diced cooked chicken
1/2 C Queso Fresco or Cotija Cheese (or you could sub grated jack, cheddar or pepperjack)

Dressing:
6 Tbs fresh lime juice (about 3 juicy limes)
1/4 C white wine or rice vinegar
4-5 cloves garlic, roughly chopped
1 1/2 tsp chili powder
1 tsp cumin
1/2 tsp coriander
1/2 tsp kosher or sea salt
2 tsp sugar (add a touch more if your limes are extra sour/bitter)
3/4 C canola oil
1/2 C roughly chopped cilantro


Boil pasta in salted water until cooked.  While it’s cooking, prepare dressing.
First zest your limes and place the zest in a large salad bowl.
Place the lime juice, vinegar, garlic, chili powder, cumin, coriander, salt and sugar in a blender.  (Basically everything except the cilantro and oil)  Process until smooth.  With the motor running slowly, add the oil in a steady stream until incorporated.  Add the cilantro and pulse so it gets broken up, but some pieces still remain in tact.
When pasta is done cooking, drain and rinse immediately with cold water to cool.  Place the pasta in the large salad bowl with the lime zest.  Add black beans, tomatoes, diced pepper, green onions, corn (no need to thaw the corn),  and chicken if desired.  Toss with dressing.  Taste, and add additional salt and pepper to taste.  For best results, chill for 1 hour before serving.  Right before serving, sprinkle cheese on top.  Serve with extra lime wedges if desired.

Makes about 4-6 dinner sized servings or 10-12 side servings

Tuesday, July 26, 2011

Creamy Alfredo Spaghetti with Asparagus


I will tell you right now that my husband just thought this was "okay."  He still ate it, of course (he's good enough to at least eat whatever I put in front of him) but it wasn't his favorite dish ever... probably because he is used to eating Olive Garden-style fettuccine alfredo.  And this recipe, my friend is lighter and healthier than Olive Garden-style fettuccine alfredo.


BUT, in my own opinion, I think it is no less delicious, just different.  But in a good way!  When you can appreciate the fact that you are eating a guilt-free version of one of the guiltiest dishes on this earth- that is a LOT to love!  Add in the fact that the taste really is fantastic (I recommend you don't compare it to another-style of fettuccine alfredo and just take it as it is) and you have a new favorite weeknight meal!

Lighter Alfredo Spaghetti with Roasted Asparagus
from Cooking Light

  • 2 cups 1% low-fat milk
  • 1/3 cup (3 ounces) 1/3-less-fat cream cheese
  • 2 tablespoons all-purpose flour
  • 1 teaspoon salt
  • 1 teaspoon butter
  • 3 garlic cloves, minced
  • 1 cup (4 ounces) grated Parmigiano-Reggiano cheese (or parmesan)
  • 1 pound asparagus, trimmed and cut into 2-inch pieces (about 2 cups)
  • Cooking spray
  • 8 ounces uncooked whole wheat spaghetti
  • 8 ounces uncooked spaghetti (or you can use 16 oz. either regular or whole-wheat spaghetti)
  • 2 tablespoons truffle oil or olive oil
  • 1/4 teaspoon freshly ground black pepper
Preparation
  • Preheat oven to 425°.
  • Combine first four ingredients in a blender; process until smooth.
  • Melt butter in a saucepan over medium-high heat. Add garlic; sauté 30 seconds. Add milk mixture to pan; cook 3 minutes or until mixture simmers, stirring constantly. Cook 2 minutes or until thickened, stirring constantly. Remove from heat; stir in cheese. Cover.
  • Place asparagus on jelly-roll pan coated with cooking spray. Bake at 425° 10 minutes or until browned, stirring once.
  • Cook both pastas according to package directions, omitting salt and fat; drain well.
  • Place pastas and asparagus in a large bowl. Add cheese mixture, tossing well. Add truffle oil and pepper; toss gently. Serve immediately.
Yields: 8 servings (serving size: 1 cup)

Nutritional Information: (per serving) 296 calories, 11.4g fat (5.2g saturated), 14.5g protein, 34.9g carbohydrate, 3.7g fiber

Thursday, July 21, 2011

Healthy Sweet Pork Salad

I know, I know, I know!  I have been seriously M.I.A.  But, for good reason.  Well okay, not really that good of a reason- I mean, it's summer after all.  Summer= no school and no school= less stress, right?
I wish! I have been busy with every little "here and there" errand and to-do task that has occupied my planner for months now.  And although it's been great and I have loved the break from school, I'm partially excited for it to start back up.  Just partially. 


 The other half of me is sad that I have no more vacations to go on.  Arkansas, Memphis, California and Mexico were my seasonal rounds of summer lovin' this year!  My new hubby and I took a week-long trip to visit the area where he served his LDS mission a couple of years ago- Little Rock, Arkansas, Memphis, Tennessee, and Southaven, Mississippi. It was AWESOME! I loved meeting all these people that he taught and loved and it was great to see how much they loved him as well.  Aww :) Also, the "Southern" culture is every bit as culturally unique as I imagined! And the southern cooking is downright dangerous!  I'll admit I came home with a couple extra you know what's....


But it's all good now... after a couple other short trips to Carlsbad and Rocky Point, I am beached-out (okay that's a lie, cause you can't really ever get enough of the beautiful Cali and Mexi beaches...).  I am home, and alive, and ready for the new school year, and back to a more regular cooking schedule!

To compensate for the little extra weight I picked up in the South, I have been eating super healthy since I returned.  This recipe I'm about to share is a perfect no-guilt recipe makeover for those super fatty SWEET PORK SALADS at CAFE RIO AND COSTA VIDAS!!!  Seriously, those salads are one of my weaknesses.  SO. GOOD.  This recipe is comprised of 3 recipes... one for the cilantro-lime rice (which, by the way is the best rice I have ever, ever had.  Even when eaten alone.), the sweet pork, and the salad itself.  You need to try it!


Slow Cooked Sweet Barbacoa Pork
Gina's Weight Watcher Recipes
Servings: about 10 • Serving Size: 3 oz • Old Points: 4.5 pts • Points+: 5 pts
Calories: 202.5 • Fat: 6.3 g • Protein: 26.2 g • Carb: 11.5 g • Fiber: 0.6 g

Adapted from Favorite Family Recipes

Marinade:
  • 2.5 lbs pork loin roast, all fat trimmed
  • salt and pepper
  • garlic powder
  • 6 oz Coke zero
  • 1/4 cup brown sugar (unpacked)
  • 1/4 cup water
Step 2
  • 8 oz Coke zero
  • 6 oz can sliced green chilies
  • 8 oz tomato sauce
  • 1 chipotle chile in adobo sauce
  • 1/8 tsp garlic powder
  • 1/8 tsp cumin
  • 1/8 tsp chipotle chili powder (to taste)
  • salt and pepper to taste
  • 1/3 cup brown sugar (unpacked)

Season pork with salt, pepper and garlic powder and place in the crock pot. Add 6 oz of coke and 1/4 cup of brown sugar. Marinate refrigerated for a few hours or overnight turning meat at least once while marinating.

Remove crock from refrigerator, add water, and cook on high for about 3-4 hours (or until it shreds easily). Remove pork from crock pot and discard any liquid left in the pot. Shred pork with two forks.

Step two: In the crock pot, combine 8 oz coke, green chilies, tomato sauce, chipotle chile, garlic powder, cumin, chipotle chili powder and remaining brown sugar.

Put shredded pork back in the crock pot and combine with sauce. Adjust salt and pepper to taste, cover and cook on high 1-1/2 hours more.


Cilantro-Lime Rice
  • 1 cup long grain white or brown rice
  • 2 cups water
  • 1 teaspoon chicken bouillon granules
  • 2 tablespoons fresh lime juice
  • 2 tablespoons chopped fresh cilantro
  • salt to taste
  1. Bring the rice, water, and chicken bouillon to a boil in a saucepan over high heat. Reduce heat to medium-low, cover, and simmer until the rice is tender, 20 to 25 minutes. Remove from the heat, add the lime juice, cilantro, and salt; fluff with a fork and serve.
Nutrition Per Serving:  Calories: 115 | Total Fat: 0.3g | Cholesterol: < 1mg


Once I had the pork and rice made up, I also made a pico de gallo (you could substitute salsa), and put everything together to create a salad with lettuce, corn, black beans and fat-free sour cream added in addition to the pork and rice!  Delish!

Sunday, May 22, 2011

Vegetarian Lasagna

This lasagna is FABULOUS!!  In an effort to eat a little less meat recently, I've been searching for vegetarian recipes that are healthy and great-tasting.  Well, this one is a winner!
 I found the recipe on Pillsbury.com.  To be honest, first it was the picture that sold me.  It looked so delicious...second, it was the ingredients.  Mushrooms (I love them!) and cottage cheese (it is SO good in lasagna recipes) seemed like great ingredients to this awesome meal.


I am definitely going to make this over and over again... my husband and I absolutely loved it and did not miss the meat at all!


Vegetarian Lasagna

INGREDIENTS
2 cups tomato pasta sauce
1 medium zucchini, shredded (1 cup)
1 (12-oz.) container (1 1/2 cups) low-fat cottage cheese or 1 (15-oz.) container low-fat ricotta cheese
1 9-oz.) pkg. Green Giant® Frozen Spinach, thawed, squeezed to drain well
1/3 cup grated Parmesan cheese
2 tablespoons chopped fresh oregano or 1 1/2 teaspoons dried oregano leaves
8 precooked lasagna noodles (shelf-stable or frozen), each about 7x3 inches (can use uncooked noodles, just cook them before, and trim if too long)
1 (4-oz.) can Green Giant® Mushroom Pieces and Stems, drained
8 oz. (2 cups) shredded mozzarella cheese
DIRECTIONS
  • 1. Spray 12x10-inch sheet of foil with nonstick cooking spray. In medium bowl, combine pasta sauce and zucchini; mix well. In another medium bowl, combine cottage cheese, spinach, Parmesan cheese and oregano; mix well.
  • 2. Spread 1/4 cup sauce mixture in ungreased 8-inch square (2-quart) glass baking dish. Top with 2 lasagna noodles. Spread about 1/2 cup sauce mixture over noodles. Drop 1/2 cup of spinach mixture by small spoonfuls over sauce mixture; spread carefully. Sprinkle with 1/4 of mushrooms and 1/2 cup of the mozzarella cheese.
  • 3. Repeat layers 3 more times, beginning with noodles. Cover with foil, sprayed side down; refrigerate at least 8 hours or overnight.
  • 4. Heat oven to 400°F. Bake covered for 45 minutes.
  • 5. Uncover baking dish; bake an additional 10 minutes or until lasagna is bubbly around edges. Let stand 10 minutes before serving.
 Nutritional Information (per serving):  Calories 395, Total Fat 13g (Saturated Fat 6g)

Thursday, April 28, 2011

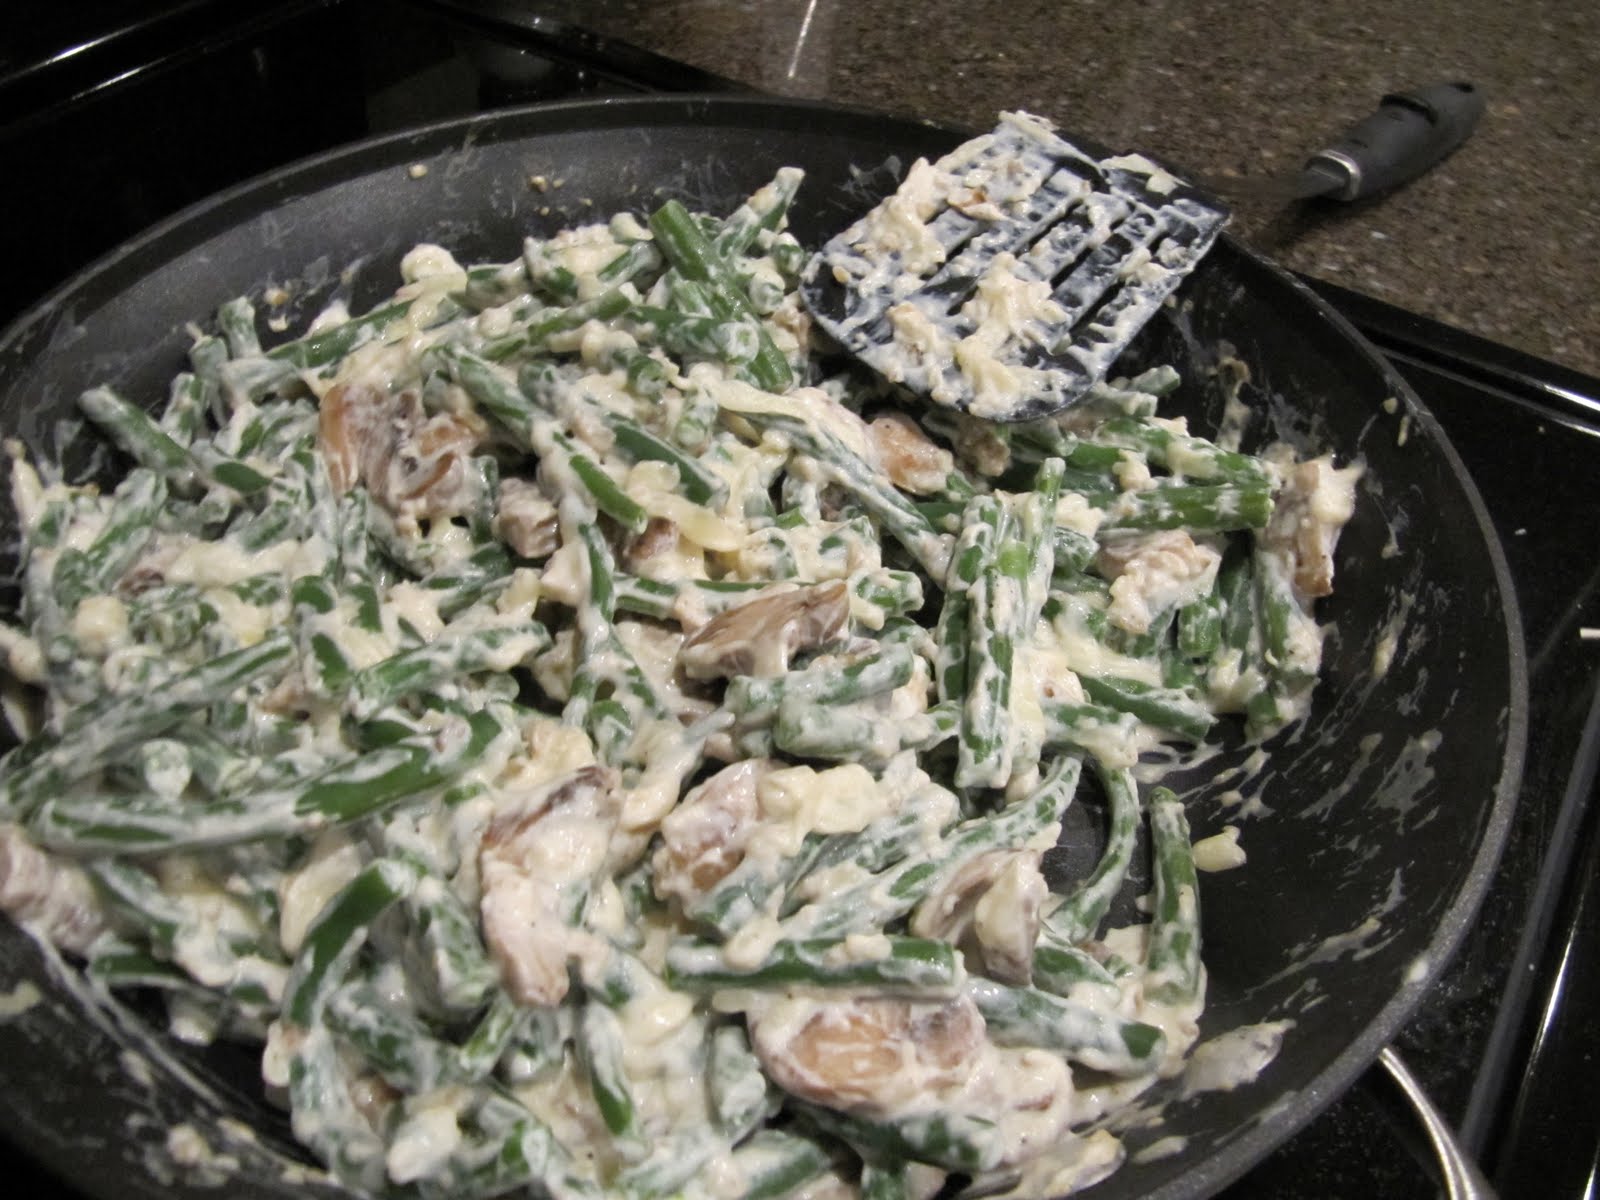
Holiday Green Bean Casserole


Okay, so I know that Green Bean Casserole is traditionally consumed on Thanksgiving.  And, let's face it- that recipe off the back of the French's fried onion can is SO good!  I started thinking- really radical thinking here- that none of the ingredients in green bean casserole are particularly designated "holiday" or "Thanksgiving" ingredients...green beans? No.  Mushrooms? Nope.  Fried onions? nada.  So why not apply the "holiday" part of the recipe name to Easter? Eh eh?


However, I did NOT make the traditional recipe from French's onion can.  I found this recipe in my Taste of Home cookbook, a healthier version, which guaranteed that "you'll never go back to the old version after trying these green beans!"  Now I don't know if I'd be so bold as to say that I will never ever go back to eating those... after all I'm not even the one who makes it on Thanksgiving... but this WAS very good.  It was lighter and healthier and very flavorful and cheesy.  Just be sure to boil the green beans for long enough- check that they are the right texture- because ours were just a tad crispier than we intended.  But it was still great.


Holiday Green Beans
Holiday Green Be
  • 8 cups cut fresh green beans (about 2 pounds)
  • 1/2 pound sliced fresh mushrooms
  • 2 tablespoons butter
  • 2 tablespoons all-purpose flour
  • 1 teaspoon dried minced onion
  • 1/2 teaspoon pepper
  • 1/2 cup fat-free milk
  • 1 cup reduced-fat sour cream
  • 1 teaspoon Worcestershire sauce
  • 1-1/2 cups (6 ounces) shredded reduced-fat Swiss cheese

  • TOPPING:
  • 1/3 cup slivered almonds
  • 1/3 cup crushed cornflakes
  • 1 tablespoon butter, melted

  • Place beans in a Dutch oven and cover with water; bring to a boil. Cover and cook for 3-5 minutes or until crisp-tender; drain and set aside.
  • In a large skillet, saute mushrooms in butter until tender. Stir in the flour, onion and pepper until blended. Gradually stir in milk. Bring to a boil; cook and stir for 1-2 minutes or until thickened. Remove from the heat; stir in sour cream and Worcestershire sauce. Stir in beans and cheese until blended.
  • Transfer to an 11-in. x 7-in. baking dish coated with cooking spray (dish will be full). Combine topping ingredients; sprinkle over the top.
  • Bake, uncovered, at 400° for 12-16 minutes or until bubbly and heated through. Yield: 12 servings.


Nutrition Facts: 2/3 cup equals 144 calories, 7 g fat (3 g saturated fat), 20 mg cholesterol, 108 mg sodium, 12 g carbohydrate, 3 g fiber, 9 g protein. Diabetic Exchanges: 1 lean meat, 1 vegetable, 1 fat, 1/2 starch

Monday, April 25, 2011

Veggie Quesadillas

After loads and eons of junk food and candy yesterday (hello Easter Bunny), I feel confident in saying that I am GLAD to be back on a regular eating schedule again.  ("Easter" seemed to last the whole weekend with one of my best friends getting married on Saturday- Saturday's wedding and Sunday's Easter celebration were just full of free treats and gimmes)

And boy is this recipe perfect for a sugar OD (overdose) reversal.  Because it's full of veggies and healthy goodness.

These veggie quesadillas are really, really good.  I promise you that you will not even notice that there is no meat in them.
Speaking of meat, I have recently decided that I want to eat far less meat in my diet.  

I am a student at ASU studying nutrition and we recently learned all the details about how we get meat/poultry.  I have always been a meat lover but since that class, I honestly can say that I do not look at meat in the same way.  The few days following last week's lecture, I have found meat to almost appall me- it didn't even TASTE good.  Now, I'm sure that this is probably just a phase that I will outgrow.  However, the following day I read a post on The Healthy Apron called "Meat-Less May."  I was really intrigued to learn that a lot of people are going to try eating vegetarian either partially or completely for the month of May.

Do I dare say I might do it??  I am very curious at how hard it will be.  Will my body will start to crave meat or will I accustom to a meat-less diet?  And how will my body feel?  I know that if vegetarians do not cleverly plan their diets, they can be at risk for low protein and iron intakes.  I will definitely have to get my protein and iron from other  foods like milk and nuts and iron-supplemented cereal.  


I am very interested in this meat-less May idea and am going to do it!  Do you dare try it as well?

Start with this Veggie Quesadilla recipe and you'll find that meat-less cooking is: a) inexpensive, b) delicious, and c) healthy!

Veggie Quesadillas
from Favorite Family Recipes

1 c. frozen corn
1 c. grated zucchini (juices squeezed out)
1/2 bunch cilantro, chopped
2 Tbsp. diced jalapeno (or more if you like it hot)
1 can black beans, drained and rinsed
1/2 tsp. salt
1/4 tsp. pepper
1-2 tsp. chili powder
1/2 tsp. cumin
2 c. Monterey Jack cheese (or cheddar or Mexican blend), shredded
flour tortillas (I recommend whole-wheat tortillas)

In a large bowl, combine all ingredients except for the cheese (and tortillas of course). Place mixture in a large skillet and fry until hot. In the meantime, heat a medium-sized skillet over medium heat. Place a tortilla in the pan. On half of the tortilla add a few large scoops of the corn/bean mixture and a little cheese. Fold tortilla over, then flip sides. When cheese is melted, cut in half and serve!

Sunday, April 17, 2011

Zucchini Bake with Feta and Thyme

As much I wish weren't true, I'm not a HUGE veggie lover.  Don't get me wrong, I really like potatoes, and corn and carrots and snap peas and just about most other veggies.  But I don't completely LOVE them.  I don't crave them, you know?

I especially don't like cucumbers or zucchinis.  Funny how the name of this post is zucchini, yeah?

Well, this recipe that I found at Real Mom Kitchen pretty much changed my mind!
The soft, baked zucchini and yellow summer squash taste delicious with the savory herbs and feta cheese.  I will definitely make this again!

Zucchini Bake with Feta and Thyme

  • 4 medium-sized zucchini, or a mixture of zucchini with yellow squash, sliced lengthwise and then into 1/4 inch slices (about 8 cups sliced squash)
  • 1 T olive oil (or less, depending on the pan)
  • 1 T minced garlic
  • 2 large eggs
  • 1/3 cup light sour cream
  • 1 cup crumbled feta (not tightly packed)
  • 1/2  T dried thyme
  • 2 T grated Parmesan cheese
  • 1 T lemon juice
  • salt and fresh ground black pepper to taste
  1. Preheat oven to 375 degrees. Wash and dry squash, then cut off stem and blossom end and discard. Cut squash lengthwise in half, then slice into half-moon slices about 1/4 inch thick. (Kayln used a mandoline with a 7mm blade, but I just used a knife.)
  2. Heat olive oil in large non-stick frying pan, add garlic and saute about 45 seconds (just long enough to season the oil, don’t let the garlic brown.) Add squash slices and saute about 4 minutes, turning a few times. Squash should be barely starting to soften.
  3. While squash cooks, break eggs into a small bowl or glass measuring cup and beat until egg yolks and whites are combined. Stir in sour cream, feta, thyme,  Parmesan, and lemon juice.
  4. Spray a 2 quart gratin dish or glass casserole dish with non-stick spray or olive oil. Layer half the squash in the dish, then season with salt and fresh ground black pepper. (Remember the feta is salty, so it won’t need a lot of salt.) Pour over half the egg-feta mixture and use the back of a spoon or a rubber scraper to spread it over the squash. Repeat with another layer of squash and the rest of the feta-egg mixture.
  5. Bake at 375 degrees for 40-45 minutes, or until the mixture is bubbling, slightly set, and top if lightly browned. Serve hot. Makes 6 side dish servings.

Monday, October 11, 2010

Spaghetti Squash Marinara

You know what? Sometimes life gets really busy.  And I'm sorry that it has to be that way.  But if it wasn't, well, then... I might have more time to blog.

I think its all about... oh yeah- prioritizing?  Yeah.  First things first.  Well today is a first.  Not only am I actually being diligent and posting, but I am posting a recipe that I made TODAY.  As in a few hours ago! It is still in my stomach as I type.


I've never tried spaghetti squash before, but only heard pretty good things about it.  It's literally shaped like thin, noodley strands that resemble spaghetti!  I approve of anything resembling spaghetti and this is no exception.  Super easy, very healthy, and incredibly yummy. It tastes just like pasta! That's all I have to say about it, other than you should make this.


Spaghetti Squash Marinara


1 large spaghetti squash
1 cup marinara sauce
1/2 cup minced fresh parsley (or 1 tsp. dried)
1/2 cup grated Parmesan cheese (I used shredded Italian cheese)
salt and pepper

Preheat the oven to 400.  Use a large, sharp knife to cut the squash in half.  Scoop out the seeds and place the squash halves facedown on a lightly greased baking sheet.  Bake for 35-45 minutes, until the shells are tender enough that you can pierce them easily with a fork.  Remove the squash from the oven and lower the oven temperature to 350.  With a fork, scrape the squash strands from the shells into a large bowl.  Mix with the sauce, parsley, and about two-thirds of the cheese.  Season with salt and pepper.  Place the mixture in a casserole dish, sprinkle with remaining cheese on top, and bake for 15-20 minutes, until the squash mixture is heated through and the cheese topping is golden brown.

Makes 4 servings

Nutrition per serving: 90 calories, 3.5g fat, 3g fiber, 11g protein, 11g carbohydrate

Wednesday, September 29, 2010

Delicious Ham and Potato Soup

What's up with the warm spell lately?  I mean, here I am living in Provo, Utah- an icebox compared to my hometown of Mesa, Arizona and the highs have been in the upper 80's the past couple of weeks!

Isn't it fall now? The trees are on track with the gradually-fading greens to burnt oranges and browns, and the morning air definitely has a crisp chill to it- but then mid-day is somewhat, really warm!  Not that I'm complaining, it could definitely be worse- could be 100 degrees in Mesa, or the alternative, it could already be freezing, like last year.


So, I think for now I will just be content with the weather.  Because I know that any day now, the temperature will randomly drop 20 degrees and then I'll be begging for the warmth I knew in a "distant past."

Anyway, I'm excited it's officially autumn.  So long fresh peaches, strawberries, burgers, and corn on the cob.  Hello apples, pumpkin pie, winter squash, and delicious ham & potato soup.  This will warm your soul, even if it's still warm outside.  Seriously, this was one of the best potato soups I've had.

Delicious Ham and Potato Soup
Yield: 8 servings

3 1/2 cups peeled and diced potatoes
1/3 cup diced celery
1/3 cup finely chopped onion
3/4 cup diced cooked ham
3 1/4 cups water
2 Tbsp. chicken bouillon granules
1/2 tsp. salt, or to taste
1 tsp. ground white or black pepper, or to taste
5 Tbsp. buter
5 Tbsp. all-purpose flour
2 cups milk

Combine the potatoes, celery, onion, ham and water in a stockpot.  Bring to a boil, then cook over medium heat until potatoes are tender, about 10 to 15 minutes.  Stir in the chicken bouillon, salt and pepper.
In a separate saucepan, melt butter over medium-low heat.  Whisk in flour with a fork, and cook, stirring constantly until thick, about 1 minute.  Slowly stir in milk as not to allow lumps to form until all of the milk has been added.  Continue stirring over medium-low heat until thick, 4 to 5 minutes.
Stir the milk mixture into the stockpot, and cook soup until heated through.  Serve immediately.


Nutrition per serving:  195 calories, 10.5g fat, 30mg cholesterol, 394mg sodium, 19.5g carbs, 1.9g fiber, 6.1g protein

Tuesday, September 28, 2010

Honey Glazed Carrots

My first memory of steamed/cooked/soft, yummy carrots is of my mom's weekly Sunday roast dinner.  Ever since I can remember, a juicy rump roast with potatoes and carrots aromatically simmered in the crock pot all Sunday morning and into the afternoon when we returned from church.  

The simple crock-pot meal is still today a family favorite. I mean, it's just pure comfort food!

These carrots reminded me a tad of the large cooked carrot halves my mom threw in with the roast; soft and tender and juicy.  Dare I say, however, that these glazed carrots are even better??


They are SO simple to whip up in five minutes and are a great way to jazz up your daily vegetable intake.  YUM!


Honey Glazed Carrots
1/4 cup water
3 cups chopped carrots (or baby carrots)
1 tsp butter
1 Tbsp honey
nutmeg to taste

In medium saucepan, bring the water to a boil.  Add the carrots and cook, covered, over medium heat for 10-15 minutes, until the carrots are tender.  Drain.  Add the honey and butter to the hot saucepan, and stir until they are melted together.  Add the carrots and gently toss.  Sprinkle with nutmeg.  

*Carrots can also be cooked in the microwave.  Cooking times will vary.

Thursday, July 22, 2010

Greek Chicken and Barley Salad


I personally think that the coloring of a food or recipe is really important to its appeal.  And, personally, this salad hits the mark, wouldn't ya say?

I've never made a "greek" recipe before, and to be honest the thought kind of intimidated me.  Kind of.  Not the THOUGHT of greek food; because that I love- pitas, hummus, olives, tomatoes... all are very delicious.  I've also never cooked barley, but the barley in this recipe is the shining star!  It's cooked in chicken broth so it has a warm, but mild flavor, and when combined with all of the other ingredients, its nothing short of fabulous! 


This recipe was a Family Dinner Grand Prize Winner this year on www.myrecipes.com! Woo! 


Greek Chicken and Barley Salad

  • SALAD:
  • 2  (6-ounce) skinless, boneless chicken breast halves
  • 1/8  teaspoon  kosher salt
  • 1  teaspoon  olive oil
  • 4  cups  fat-free, less-sodium chicken broth, divided
  • 1  cup  uncooked pearl barley
  • 2  cups  cubed seeded cucumber
  • 1  cup  grape tomatoes, halved
  • 1/2  cup  cubed yellow bell pepper
  • 1/3  cup  reduced-fat feta cheese
  • 1/4  cup  chopped pitted kalamata olives

  • DRESSING:
  • 3  tablespoons  extra-virgin olive oil
  • 1  teaspoon  grated lemon rind
  • 2  tablespoons  fresh lemon juice
  • 1  tablespoon  minced fresh basil
  • 1  teaspoon  minced fresh thyme
  • 1  teaspoon  red wine vinegar
  • 1/2  teaspoon  kosher salt
  • 3  garlic cloves, minced

Preparation

1. To prepare salad, sprinkle chicken with 1/8 teaspoon salt. Heat 1 teaspoon oil in a nonstick skillet over medium-high heat. Add chicken; cook 2 minutes on each side or until browned. Add 1 cup broth; cover, reduce heat, and simmer 10 minutes or until done. Cool; shred chicken. Discard broth.
2. Bring 3 cups broth to a boil in a large saucepan; add barley. Cover, reduce heat, and simmer 35 minutes or until liquid is absorbed. Fluff with a fork. Cool. Combine chicken, barley, cucumber, and next 4 ingredients (through olives) in a large bowl.
3. To prepare dressing, combine 3 tablespoons oil, rind, and remaining ingredients; stir well. Add to barley mixture; toss well. Cover and chill.
Makes 8 servings (serving size= 1 cup)
Nutrition: 230 calories, 9.8g fat, 18g protein, 18.3g carbohydrate, 3.2g fiber, 38 mg cholesterol
Related Posts Plugin for WordPress, Blogger...